One repository and six commands to deploy your model.
Github repository with code
Tutorial how to deploy your machine learning models with just one command
Outline
In this post I will create a simple API and deploy it with AWS Cloudformation. I want to achieve the following:
- create a Node.JS API to serve my machine learning models.
- connect API service to a data warehouse solution (in my case it would be BigQuery)
- deploy my service using Docker and AWS Cloudformation
Prerequisites, Libraries and setup
- Node.js. You will need it to create a new Swagger API.
- GCP Account with enabled Google BigQuery. I will use BigQuery as a data warehouse solution to store my data and train ML models. It's very useflul when it comes to data cleansing. Then I can export data and train my models in Spark or even train it straight away in BigQuery. Some common tasks like logistic regression are already there.
- AWS account to deploy your service. Yes, we will go fully hybrid in this excercise.
- AWS CLI 5.
Free tiers are available so it won't cost you anything but it is always a good idea to keep an eye on Billing.
By the way with AWS Cloudformation you can delete all associated resources and then create them again with one click.
Step 1. Create a new Swagger project
I'll use swagger 1 package to create my API.
$ npm install -g swaggercd Documents/code$ swagger project create ml-service- Choose Express as a Framework.
- Success! You may start your new app by running:
$ swagger project start ml-service
Step 2. Connect your ml-service and BigQuery data warehouse
We assume we have a machine learning model saved in BigQuery, i.e. Churn prediction, etc. Let's build a data connector to serve those predictions with our service.
Create a service account for your ml-sevice
This is required to authorise your app so it could access data in BigQuery.
./bq-shakhomirov-b86071c11c27.json is an example of BigQuery credentials file. You will need this Service account credentials file to authenticate your micro service with Google so it could actually do something.
Read more about Service Account authentication here.
Just download it from your Google Cloud Platform account and add to your app folder.
It would look like that:
However, we are are building a service with swagger so let's add it to config/default.yaml.
Finally it should look like that:
Add an endpoint to your API routes
We will use this endpoint to return the data we need.
In next steps we will create a function as a controller so everytime we hit API endpoint it will execute and pull data from our BigQuery table.
Go to api/swagger/swagger.yaml and add new API endpoint right after default /hello_world endpoint:
Add a swagger api controller (function)
It will run a SQL query and return model data from BigQuery table.
Let's call it api/controllers/userList.js and it will be used to return a list of users in case we want to use it somehow, i.e. in retargeting.
In this case api/controllers/userList.js will handle responses, status codes for our endpoint.
And bigQueryHelper added as a dependency will be responsible for any data warehouse logic we need including potential data transformation, cache and everything else.
BigQuery helper
This will handle actual connection and our data logic.
Let's create a file api/helpers/bigQueryHelper.js
Install reuired 3rd party dependencies
We will use only two.
Run this command:
$ npm i @google-cloud/bigquery http-status-codes --reg http://registry.npmjs.org/
Now run $ swagger project start and try a suggested $ curl http://127.0.0.1:10010/hello?name=Scott
Note: if you are running Node.js higher than 10.x you will most likely face this error 4
I wish swagger-node will receive more timely updates but here is a fix.
Quick fix
Update your swagger-express-mw:
"swagger-express-mw": "^0.7.0"Add swagger_params_parser to swagger_controllers at
config/default.yamlRun
npm installRun
swager project startTry
curl http://127.0.0.1:10010/hello?name=Scottagain. Everything should run okay now.
Populate your table in BigQuery
We assume that model trainer runs as a separate process and populates our table, for example, daily. Let's mock some data. Run this SQL in your data warehouse:
Finally
If everything is working fine then try running our BigQuery data connector
$ curl http://localhost:10010/userList/3
Output must be:
Here we created a simple data service which will serve data from your data warehouse.
Step 3. Docker image and deploy with AWS Cloudformation
Create docekrfile ./Dockerfile:
Build Docker image
In your command line run:
$ docker build -f Dockerfile -t yourAccountNumber.dkr.ecr.eu-west-1.amazonaws.com/ml-service:latest .$ docker run -p 80:10010 -it yourAccountNumber.dkr.ecr.eu-west-1.amazonaws.com/ml-service:latest
This binds port 10011 of the container to TCP port 80 on 127.0.0.1 of the host machine.
Remember you expose port 80 so try:
$ curl http://localhost:80/userList/3
Output: Output must be:
So now when we have built a Docker image let's PUSH it to AWS ECR repository. We need to create one first.
Create AWS ECR repository
You will need AWS CLI for this.
Create AWS Cloudofrmation file (copy - paste this): cloudformation/ecr.template
Run:
$ cd ./cloudformation- Replace MyMlServiceRepository and ml-service with your names and run this:
If successful output would be something like this:
{ "StackId": "arn:aws:cloudformation:eu-west-1:53763437664:stack/MyMlServiceRepository/123f55-a9ea-11ec-97f2-02af2e5b45e7" }
Now if you go to AWS console and choose Cloudformation you will see your stack with associated repository resources.
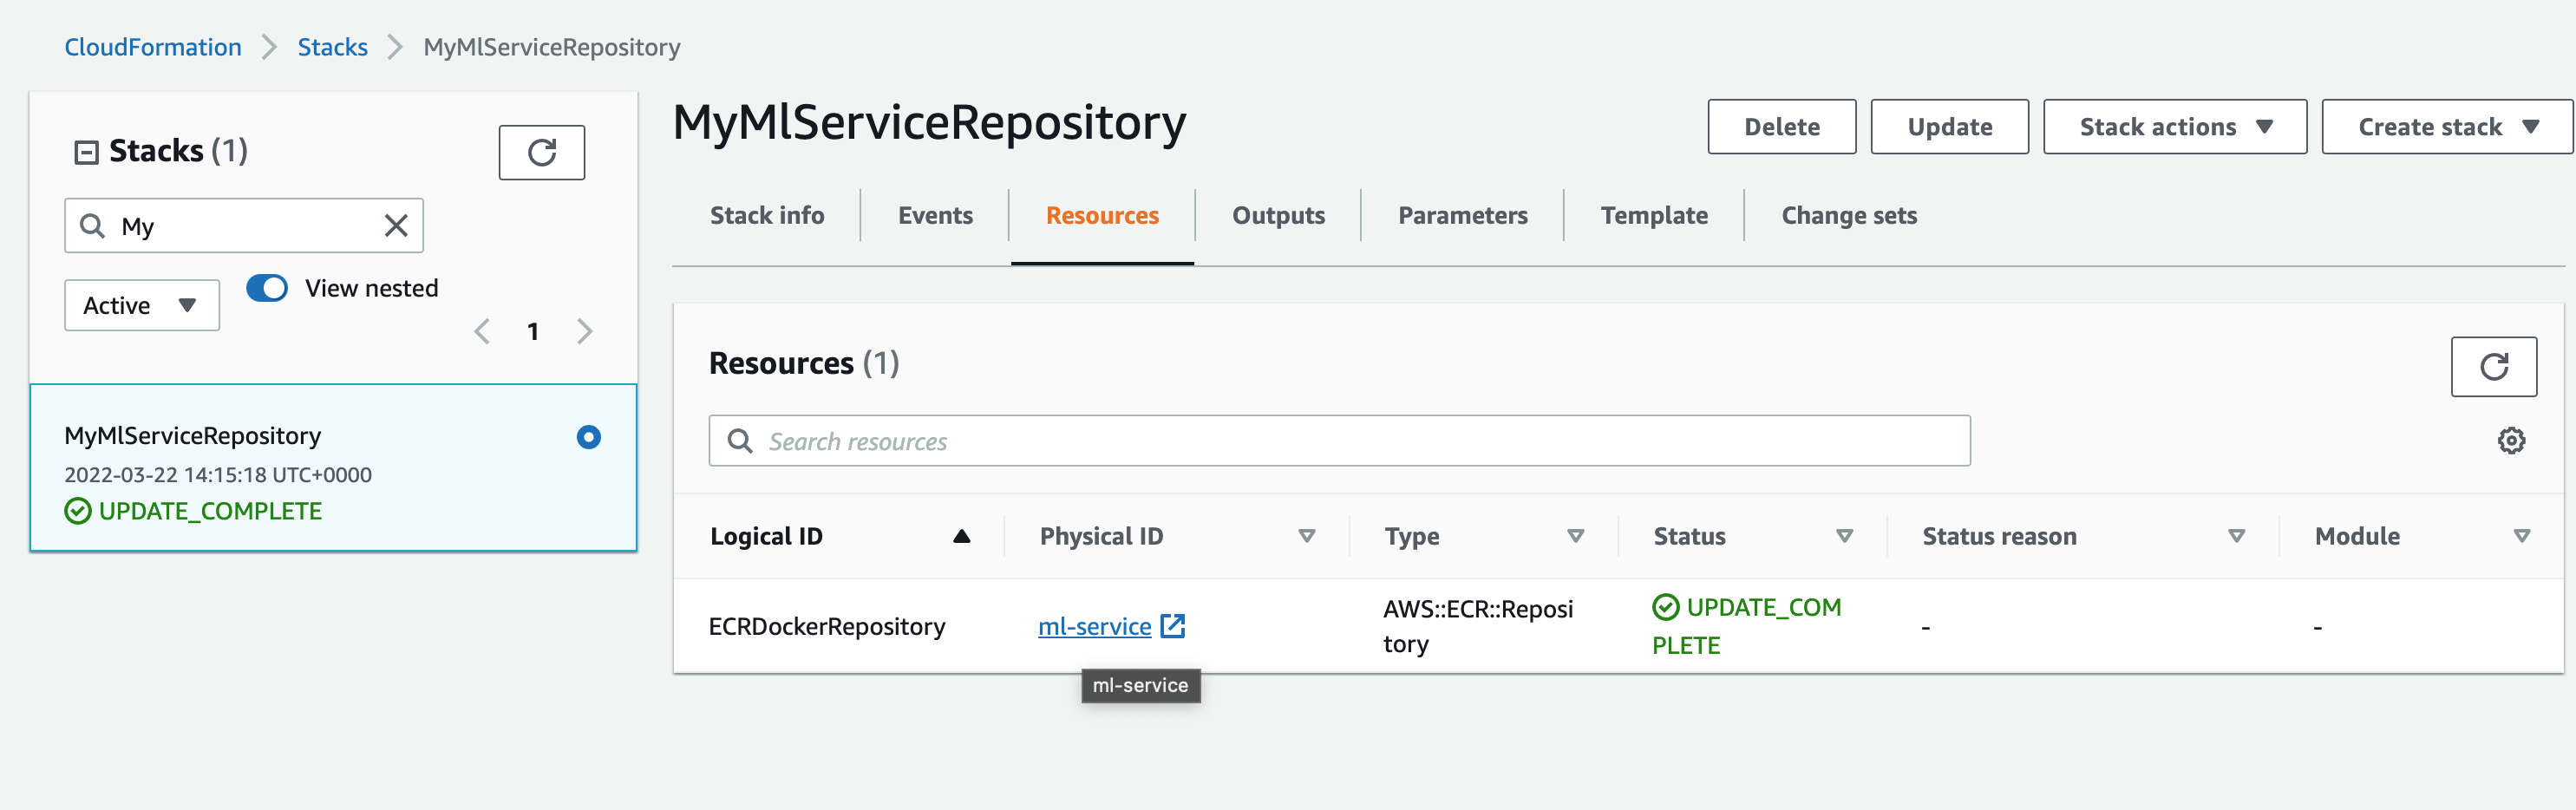
Now let's PUSH our image to this repo:
$ docker push yourAccountNumber.dkr.ecr.eu-west-1.amazonaws.com/ml-service:latest
If you face no basic auth credentials error then you might want to login first:
Push again and your Docker image will be uploaded:
Create resources and deploy our service using Cloudformation stack
Now we have our Docker image in AWS we would want to deploy our service in the Cloud.
I want to create all associated resources with just one command, i.e. EC cluster, task definitions and load balancer.
Use ./cloudformation/cluster_and_task.yaml to create a cluster and ECS service with task definition and load balancer. It is safe to delete and re-create again
AWS Cloudformation allows to do it with ease
Create a Docker cluster, task definition and Load balancer with just one Cloudformation file.
Before you run a create command got to ./cloudformation/cluster_and_task.yaml and make sure that stack papameters exist:
- KeyName
- image
- VPC
- subnets of your defualt VPC
Go to EC2 service and create a key pair with name dockerClusterKeyPair.
Make sure other default names in stack file match your AWS account.
In your command line run:
$ aws cloudformation create-stack --template-body file://cluster_and_task.yaml --stack-name MlServiceStaging --capabilities CAPABILITY_IAM
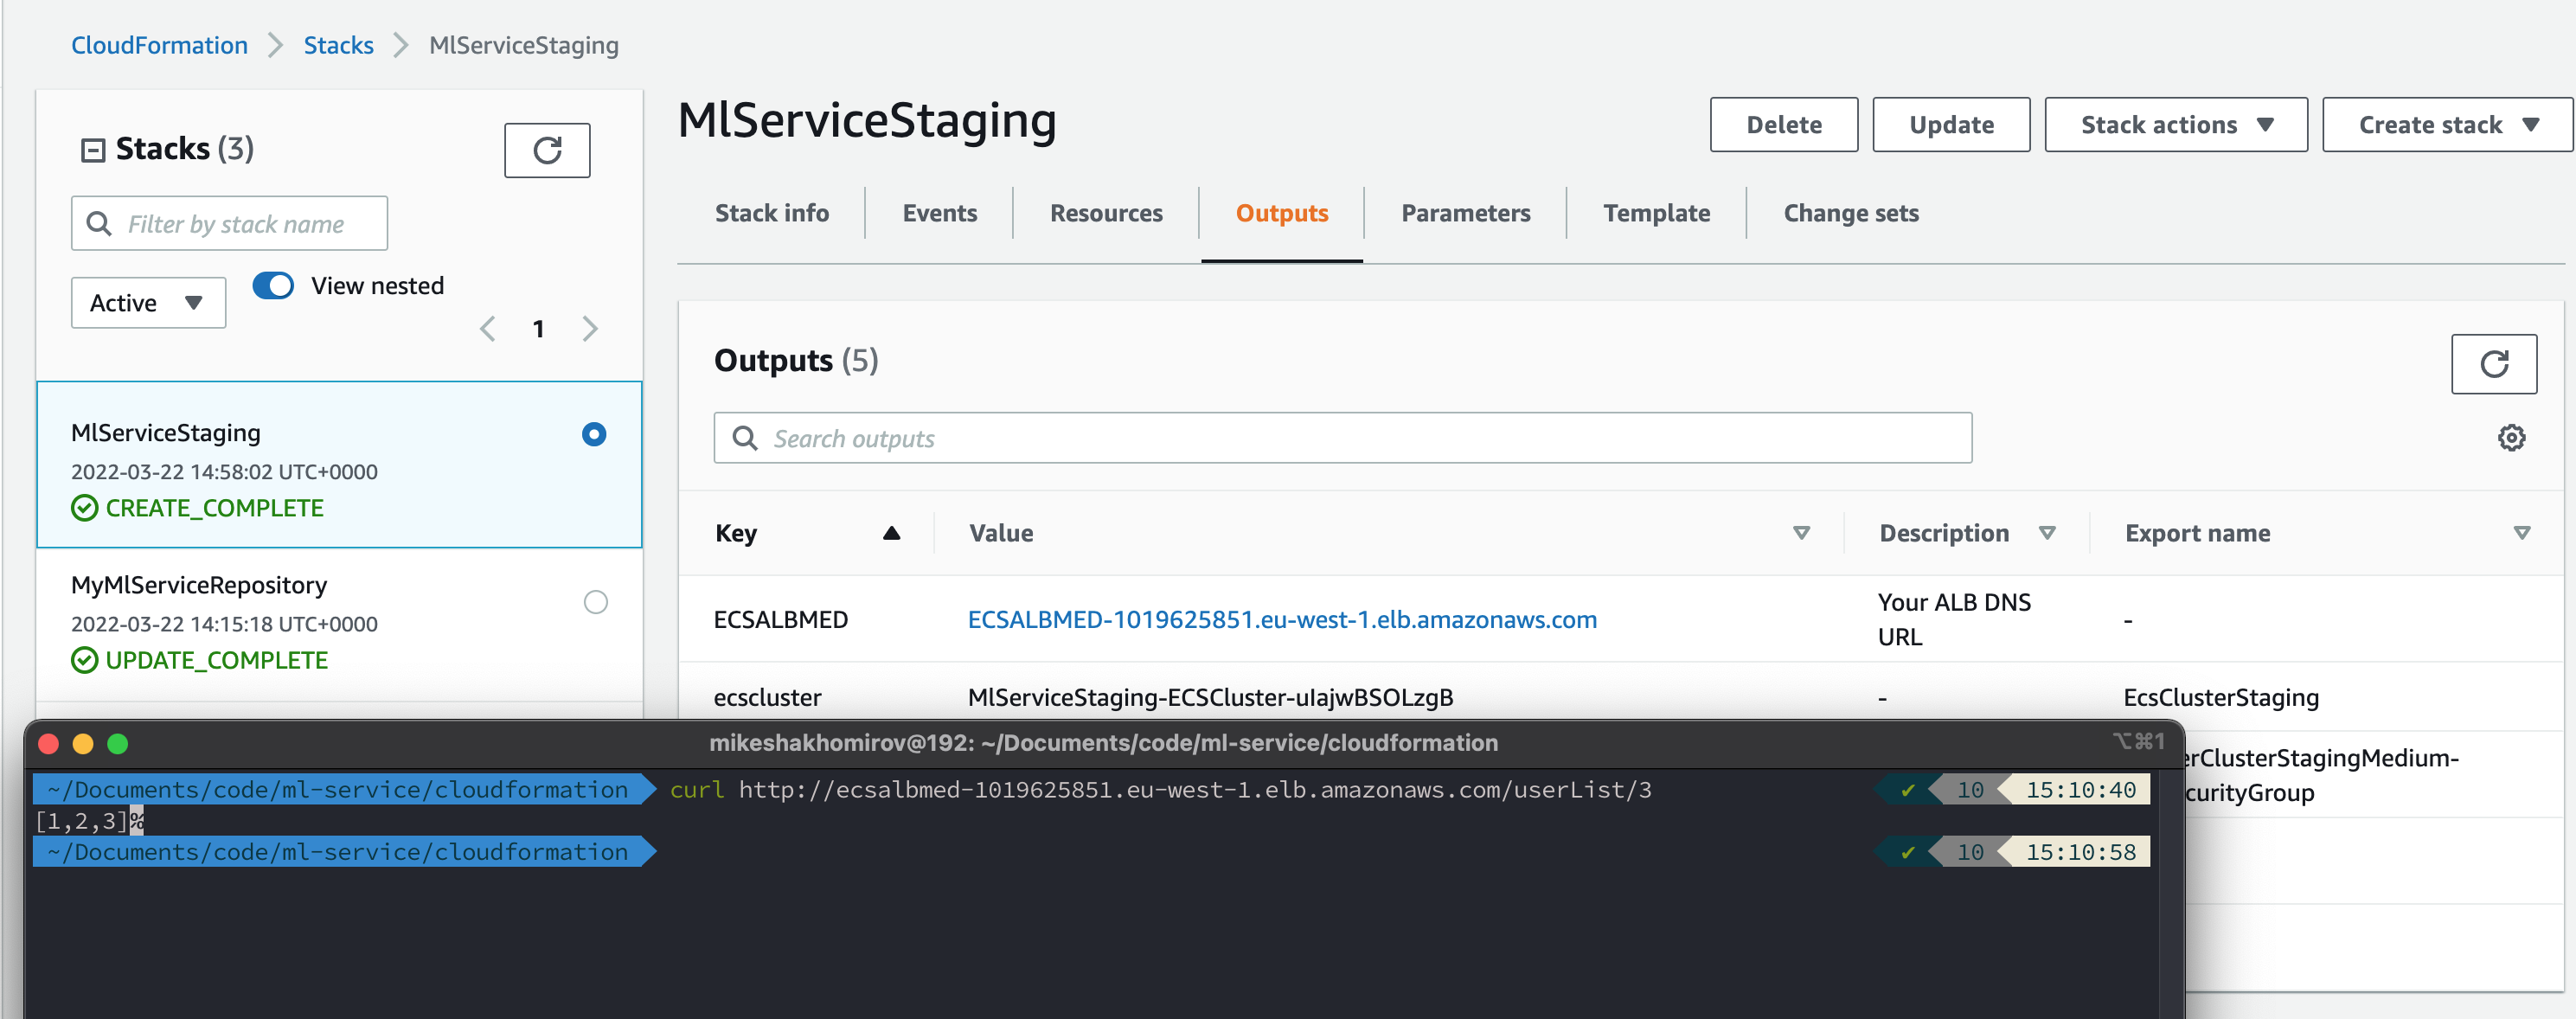
When stack has been successfully created you will see your ELB (Load balancer) endpoint in outputs:

$ curl http://ecsalbmed-1019625851.eu-west-1.elb.amazonaws.com/userList/3
Now you can safely delete complete stack.
Alternatively you can supply all your stack parameters from file, i.e.
$ aws cloudformation create-stack --template-body file://cluster_and_task.yaml --stack-name MlServiceStaging --capabilities CAPABILITY_IAM --parameters file://staging.json
For more information, see the Troubleshooting section of the Amazon ECS Developer Guide 6.
Conclusion
We have created a simple and reliable API service to serve our machine learning models from BigQuery. Using infrastructure as code makes it really easy to deploy, alter and make any types of modifications. For example, you might want to create another data connector to pull predictions from Postgres and apply some fancy data transformation logic before you serve it to customers. AWS Cloudformation makes your code reusable. Deployment process including CI/CD becomes very straightforward. I know, infrastructure as code is a massive separate topic but once you've mastered it it's a massive help and an incredible increase in speed for your deployments.
Resources


Mike
Mike is a Machine Learning Engineer / Python / Java Script Full stack dev / Middle shelf tequila connoisseur and accomplished napper. Stay tuned, read me on Medium https://medium.com/@mshakhomirov/membership and receive my unique content.
Comments
Jen Lopez November 13, 2021
Very useful.