Advanced cheat sheet for beginners
Consider this article as a user-friendly introduction to Infrastructure as Code with a collection of stack file samples to deploy resources that your data platform might need.
I will try to cover the most common fallbacks I faced when I was trying to deploy data stack resources with Infrastructure as code. I will explain how to create, update, manage and import things like data lake buckets, databases, streams and data processing pipeline microservices. You will find the link to the Github repository at the bottom.
Infrastructure as code is becoming an increasingly popular approach for managing data platform resources. Among software engineers it is pretty much standard these days, and it definitely looks great on your CV!
So why not deploy your data stack with code?
Infrastructure as code is a fantastic strategy to create and manage new cloud resources, i.e. cloud storage buckets or event streams, as well as for streamlining data engineering processes, including CI/CD pipelines.
Take a look at this code snippet below.
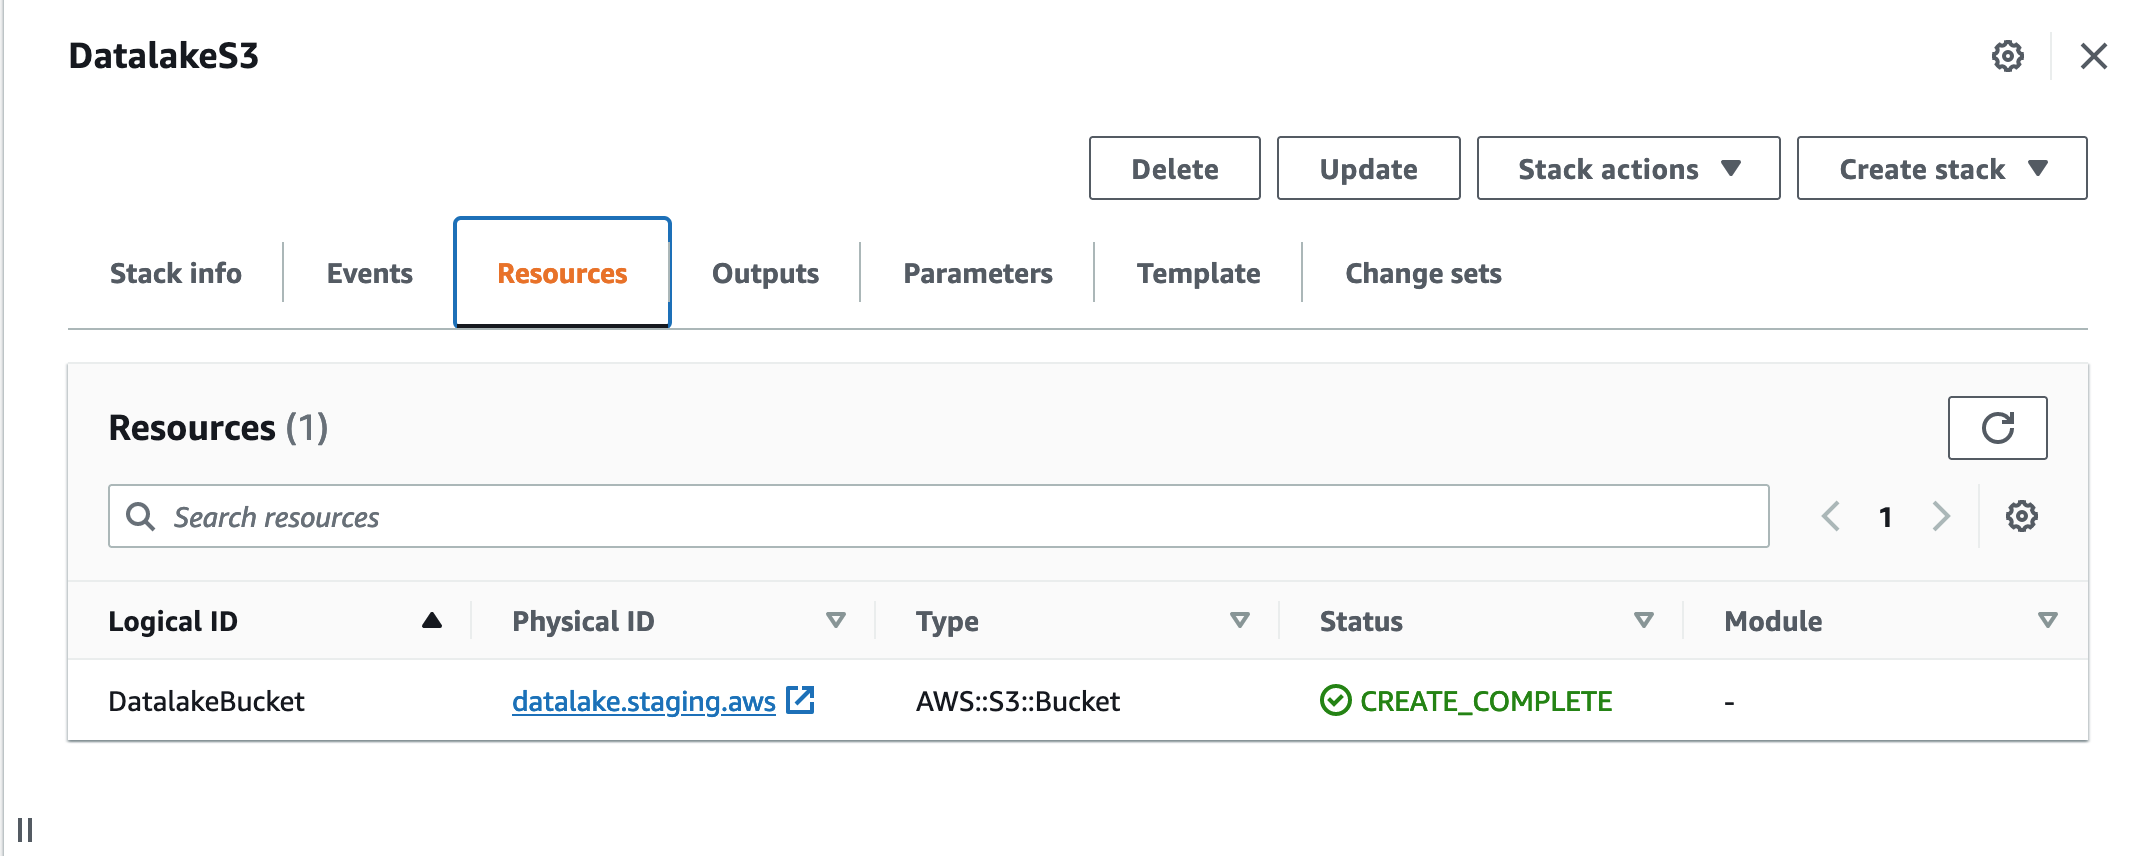
It's a very simple S3 configuration for a data lake bucket.
# simple_stack.yaml
AWSTemplateFormatVersion: '2010-09-09'
Description: AWS S3 data lake stack.
Parameters:

  SourceDataBucketName:
    Description: Data lake bucket with source data files.
    Type: String
    Default: datalake.staging.aws

Resources:

  DatalakeBucket:
    Type: AWS::S3::Bucket
    DeletionPolicy: Retain
    Properties:
      BucketName:
        Ref: SourceDataBucketName
      PublicAccessBlockConfiguration:
        BlockPublicAcls: true
        IgnorePublicAcls: true
        BlockPublicPolicy: true
        RestrictPublicBuckets: true
Long story short, with just one file where you stack and describe your resources, you can create and change all infrastructure required data lake storage buckets, cloud functions, event streams, alarms, logging, databases and much more.
That's why I like it, it simplifies and automates provisioning, can be connected to Github and helps to model data platform resources consistently and very quickly.
Personally, I'm a big fan of command line, bash scripts and automated deployments, so
if you would like to learn a few easy tricks on how to create new data pipelines with AWS Cloudformation, this article is for you.
Of course, there is Terraform and many others but I am going to cover AWS Cloudformation in this article. It is used by many serious companies, and it definitely won't harm you if you know how to use it.
Create a new folder for your stack:
mkdir stack
cd stack
Your folder structure will be this:
.

└── simple_stack.yaml
If you have AWS CLI installed you can run this command and it will create the bucket with required setting for your data lake:
aws \
cloudformation deploy \
--template-file simple_stack.yaml \
--stack-name DatalakeS3 \
--capabilities CAPABILITY_IAM
Your terminal output should be something like this:
cloudformation deploy \
--template-file simple_stack.yaml \
--stack-name DatalakeS3 \
--capabilities CAPABILITY_IAM

Waiting for changeset to be created..
Waiting for stack create/update to complete
Successfully created/updated stack - DatalakeS3
If you go to AWS Console -> Cloudformation, you will find your new stack there:
Working with parameters in stack files
Parameters are useful.
Depending on the case (or on environment) you might want to use the same stack file but name resources differently.
Here we can add a parameter:
Parameters:

     SourceDataBucketName:
          Description: Data lake bucket with source data files.
          Type: String
          Default: datalake.staging.aws
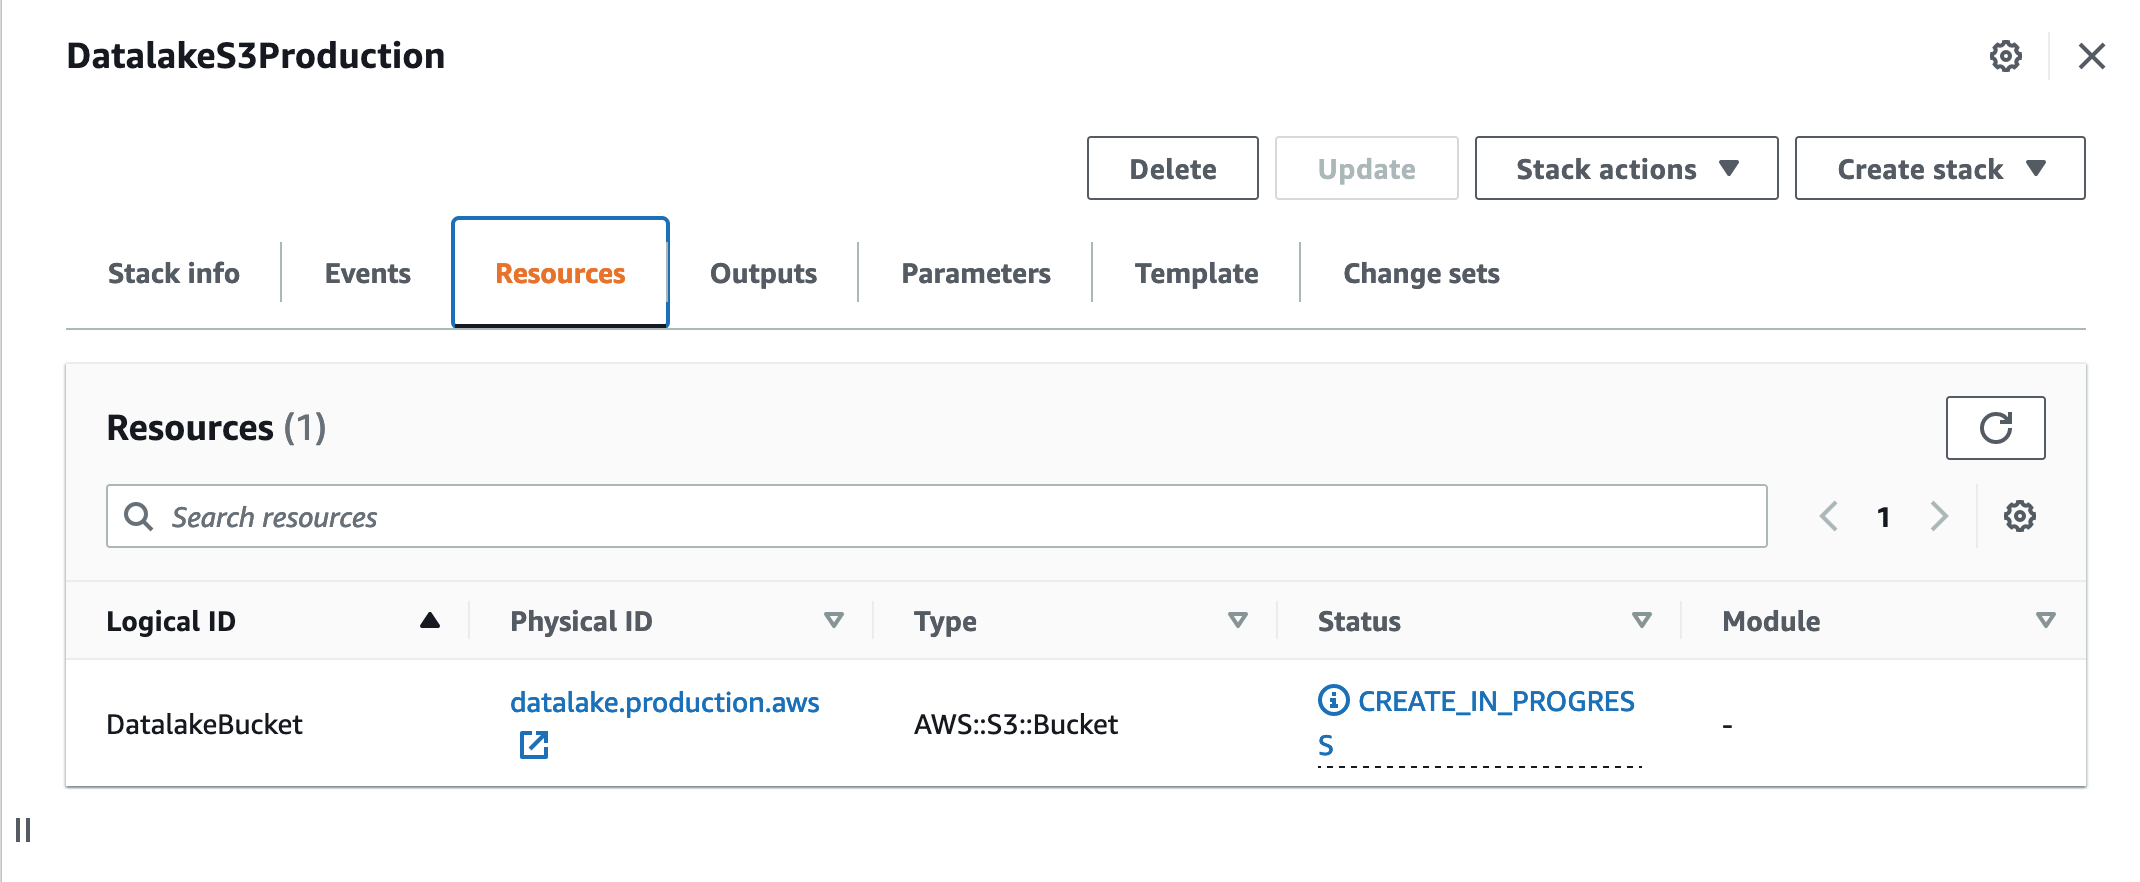
Let's imagine we want to deploy a production data lake S3 bucket:
aws \
cloudformation deploy \
--template-file simple_stack.yaml \
--stack-name DatalakeS3Production \
--capabilities CAPABILITY_IAM \
--parameter-overrides \
          SourceDataBucketName="datalake.production.aws"
Alternatively, you can supply parameters from a json file
Create a json file like so:
[
     {
     "ParameterValue": "datalake.production.aws",
     "ParameterKey": "SourceDataBucketName"
     }
]
Your folder structure will be this:
.
├── production.json
└── simple_stack.yaml
Run this in command line to deploy:
aws \
cloudformation deploy \
--template-file simple_stack.yaml \
--stack-name DatalakeS3Production \
--capabilities CAPABILITY_IAM \
--parameter-overrides file://production.json
Let's Tidy up
We might want to delete the stacks and S3 buckets we created.
Delete a stack
aws --profile mds cloudformation delete-stack --stack-name DatalakeS3Production
So we deleted the stack but we have DeletionPolicy: Retain on our data lake bucket. it will remain intact.
Delete S3 bucket
aws --profile mds s3 rb s3://datalake.production.aws/
However, to delete a bucket you will need to recursively delete all contents first.
Sometimes you might want to keep the bucket but remove all contents.
To do so we can use --exclude with an empty match string.
$ aws --profile mds s3 rm s3://datalake.production.aws/ --recursive --exclude ""
Adding a micro service to a stack
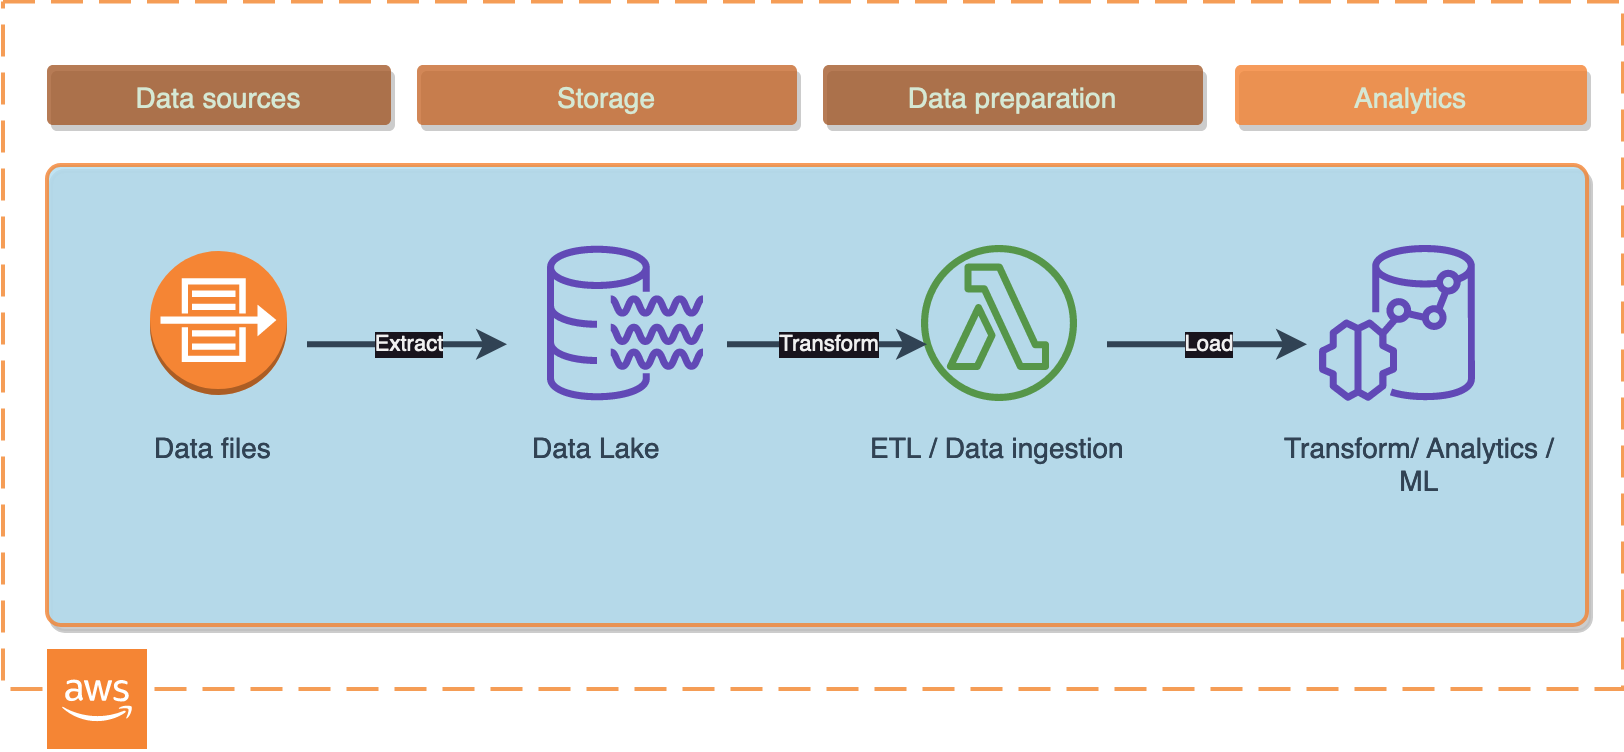
Let's imagine we have a simple micro service built with AWS Lambda to orchestrate data pipelines or to trigger data loading / quality checks / transformation, etc.
So in this case should you wish NOT to use infrastructure as code you would have to deploy the Lambda either using AWS Web Console or using AWS CLI commands. That would require to create a Lambda security role first, then create a security policy with a certain set of permissions for the Lambda, and, finally, attach it to a Lambda.
It seems like a long way to go if we need to replicate the service in another environment or anywhere else.
Alternatively, we could use AWS Cloudformation. It saves time and automates deployment:
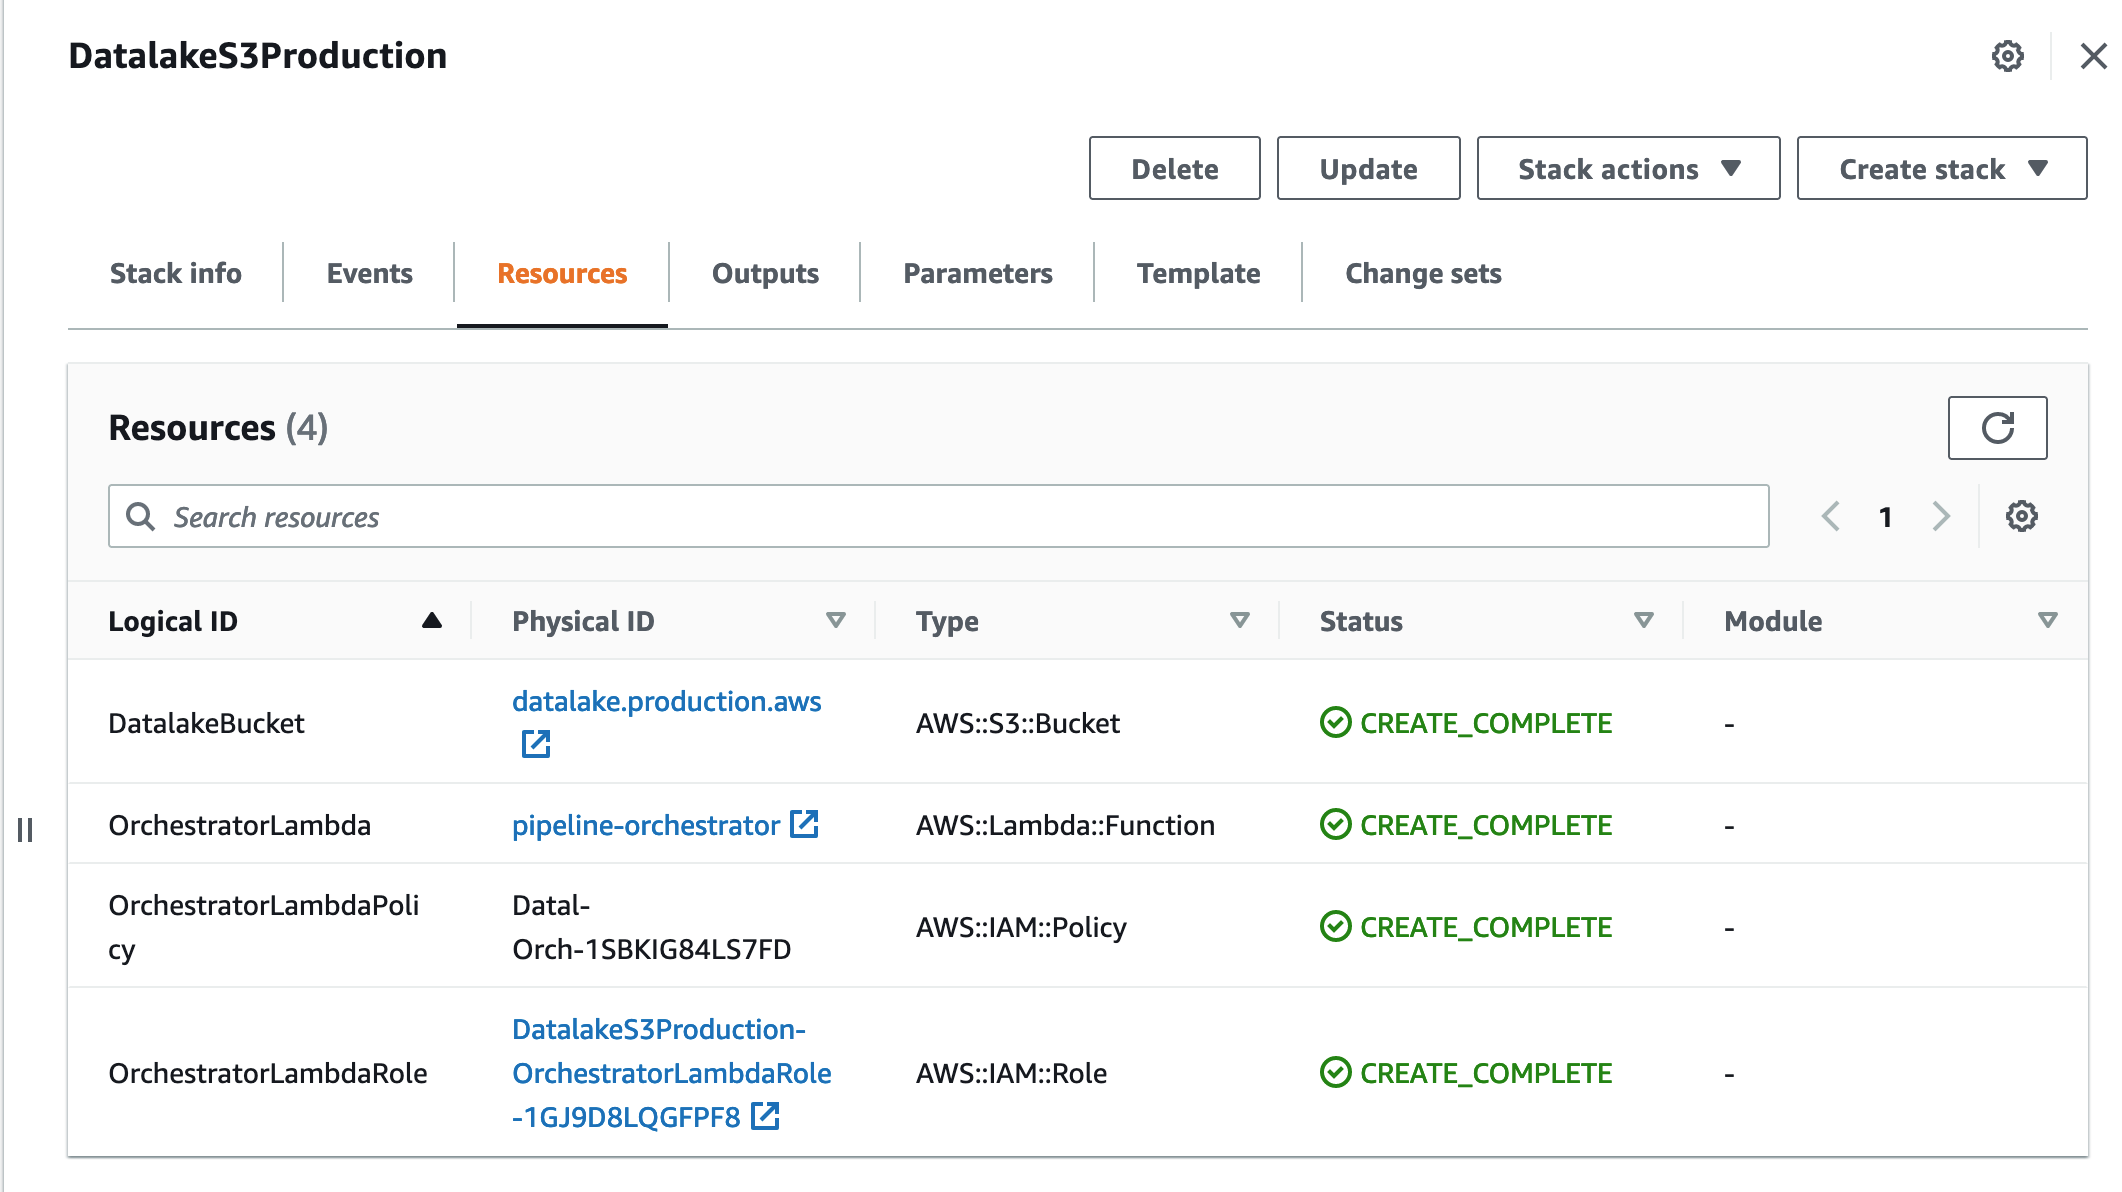
We can add our Lambda and all associated resource just like that:
Package the service and deploy
Now before we deploy the updated stack we would need to package our Orchestrator Lambda code and upload it to S3. Run this shell commands to create a bucket for code, zip Lambda contents, upload and finally, deploy the updated stack:
PROFILE=mds # change to your_aws_profile or remove --profile from the following commands
STACK_NAME=DatalakeS3Production
base=${PWD##*/}
zp="stack.zip"
echo $zp
rm -f $zp
zip -r $zp * -x deploy.sh

# 1. Create S3 bucket for Lambda code
aws --profile $PROFILE s3 mb s3://orchestrator-lambda.code.aws
# 2. Copy the package
aws --profile $PROFILE s3 cp ./${zp} s3://orchestrator-lambda.code.aws/pipeline_orchestrator/${zp}
# 3. Deploy
aws --profile $PROFILE \
cloudformation deploy \
--template-file simple_stack_with_lambda.yaml \
--stack-name $STACK_NAME \
--capabilities CAPABILITY_IAM \
--parameter-overrides file://production.json

# use this if you are using stack.zip (not a unique name each time) and cloudformation deploy
# otherwise, aws will see no changes and code won't propagate.
aws --profile mds lambda update-function-code  \
     --function-name pipeline-orchestrator \
     --zip-file fileb://$zp;
In AWS console you will see that new resources have been added to a stack:
Trigger the Lambda on all new objects created in S3
Our data pipeline orchestrator will be invoked each time data lands in the data lake.
To enable this you would want to grant AWS S3 service relevant permission to invoke your Lambda:
...
...
ProcessingLambdaPermission:
Type: AWS::Lambda::Permission
Properties:
  Action: 'lambda:InvokeFunction'
  FunctionName: !Ref OrchestratorLambda
  # # or this, both will work:
  # FunctionName:
  #   Fn::GetAtt:
  #     - OrchestratorLambda
  #     - Arn
  Principal: s3.amazonaws.com
  SourceArn: !Sub 'arn:aws:s3:::${DatalakeBucket}'
  # SourceArn: arn:aws:s3:::datalake.production.aws
  SourceAccount: !Ref AWS::AccountId
...
...
Keep in mind that bucket MUST exist before you deploy changes for
ProcessingLambdaPermission
Otherwise you will face circular dependency error (when bucket does not exist but Permission already relies on it.).
If you are deploying first time:
- Deploy a stack without ProcessingLambdaPermission
- Add ProcessingLambdaPermission and deploy again
Alternatively, you can always split into two stacks, one for base resources that have to be created first, i.e. S3, IAM roles, and the second one - for anything else.
Add NotificationConfiguration to S3 bucket
Then you would want to add a NotificationConfiguration to our data lake bucket. After this your AWS Lambda will be triggered by S3ObjectCreated events and we will be able use it to process files:
     NotificationConfiguration:
       LambdaConfigurations:
       - Event: s3:ObjectCreated:*
         Function:
           Fn::GetAtt:
           - OrchestratorLambda
           - Arn
         # Filter:
         #   S3Key:
         #     Rules:
         #     - Name: prefix
         #       Value: source/
Should you wish to limit your Lambda invocations only to a specific object prefix or suffix please feel free to use
FilteronS3Key. For example, I choose to invoke my orchestrator Lambda only on files only with source/ key in my data lake bucket.
Invoke the service
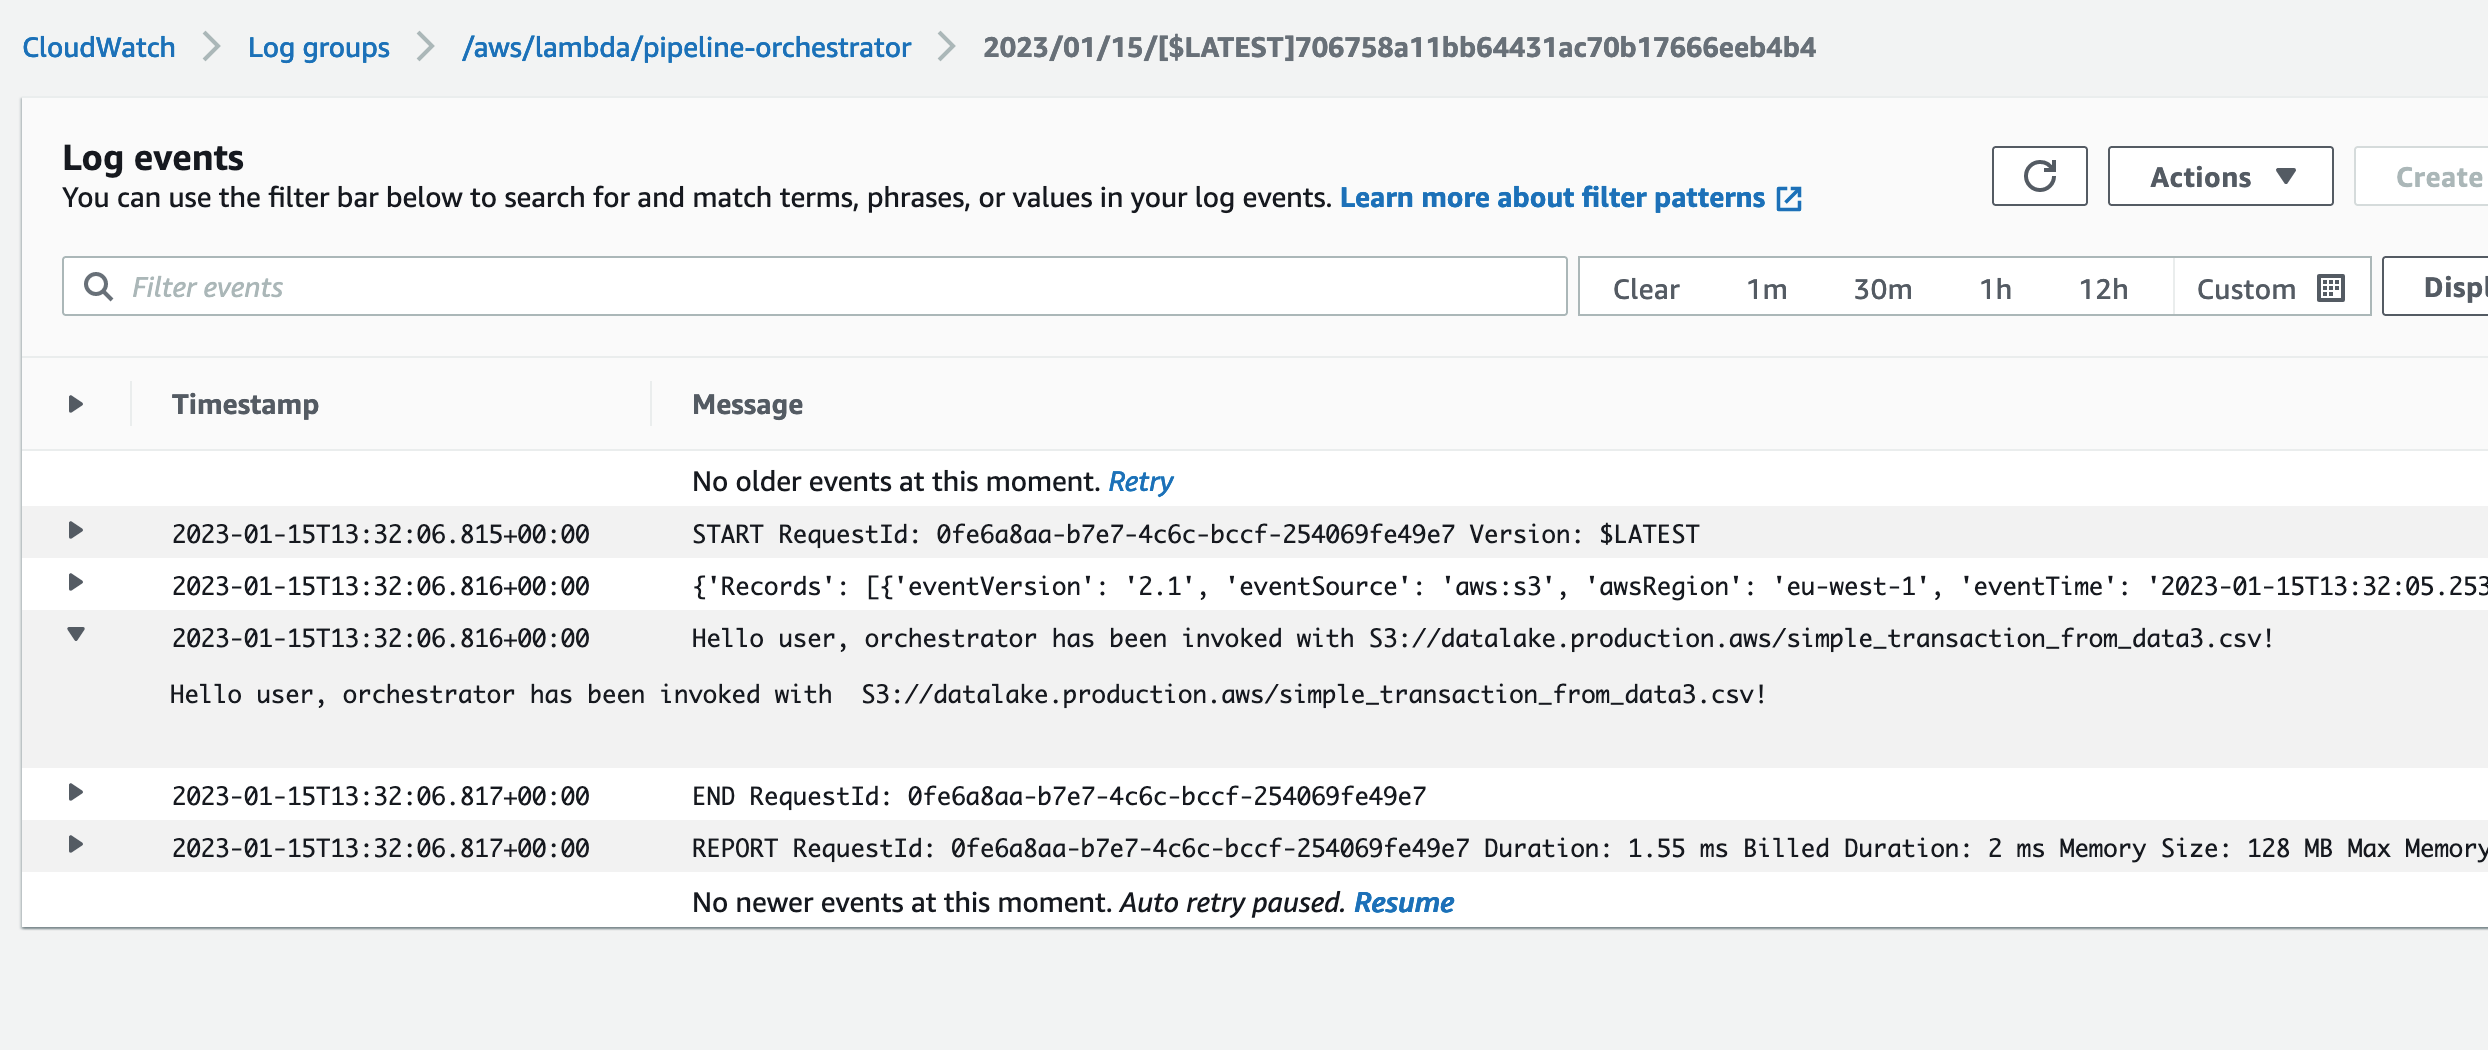
Let's emulate our service work by sending some files into the data lake.
Imagine it was a Firehose delivery stream with some data
Create a simple CSV file:
mkdir data
echo transaction_id,user_id,dt \\n101,777,2021-08-01\\n102,777,2021-08-01\\n103,777,2021-08-01\\n > data/simple_transaction.csv
aws --profile mds s3 cp ./data/simple_transaction.csv s3://datalake.production.aws/simple_transaction_from_data.csv
Now we can go to AWS console and check Lambda logs:
One important thing to consider
Using AWS Cloudformation to deploy code changes in your AWS Lambda will require one thing to add in stack.zip file name.
If we want to deploy code changes then package name must be unique each time. How to ensure that name is unique each time we deploy?
We can achieve this by using parameters in stack.yaml:
# stack.yaml
AWSTemplateFormatVersion: '2010-09-09'
Description: AWS S3 data lake stack.
Parameters:

 SourceDataBucketName:
   Description: Data lake bucket with source data files.
   Type: String
   Default: datalake.staging.aws

 StackPackageS3Key:
   Type: String
   Default: pipeline_orchestrator/stack.zip
...
...

 OrchestratorLambda:
 Type: AWS::Lambda::Function
 DeletionPolicy: Delete
 DependsOn: OrchestratorLambdaPolicy
 Properties:
   FunctionName: pipeline-orchestrator
   Handler: pipeline_orchestrator/app.lambda_handler
   Description: Microservice that orchestrates ETL and data loading from AWS S3 to data warehouse.
   Environment:
     Variables:
       DEBUG: true
   Role: !GetAtt OrchestratorLambdaRole.Arn
   Code:
     S3Bucket: orchestrator-lambda.code.aws
     # S3Key: pipeline_orchestrator/stack.zip
     S3Key:
       Ref: StackPackageS3Key
   Runtime: python3.8
   Timeout: 300
   MemorySize: 128
...
...
Now our deploy.sh will look like this:
date
TIME=`date +"%Y%m%d%H%M%S"`

PROFILE=mds # change to your_aws_profile or remove --profile from the following commands
STACK_NAME=DatalakeS3Production
base=${PWD##*/}
zp="stack${TIME}.zip"
echo $zp
rm -f $zp
zip -r $zp * -x deploy.sh

# 1. Create S3 bucket for Lambda code
aws --profile $PROFILE s3 mb s3://orchestrator-lambda.code.aws
# 2. Copy the package
aws --profile $PROFILE s3 cp ./${zp} s3://orchestrator-lambda.code.aws/pipeline_orchestrator/${zp}
# 3. Deploy
aws --profile $PROFILE \
cloudformation deploy \
--template-file simple_stack_with_lambda.yaml \
--stack-name $STACK_NAME \
--capabilities CAPABILITY_IAM \
--parameter-overrides file://production.json \
--parameter-overrides \
          StackPackageS3Key="pipeline_orchestrator/${zp}"
You will see something like that and your changes will be applied from the new package:
upload: ./stack20230115135037.zip to s3://orchestrator-lambda.code.aws/pipeline_orchestrator/stack20230115135037.zip

Waiting for changeset to be created..
Waiting for stack create/update to complete
Successfully created/updated stack - DatalakeS3Production
What else can we do with Infrastructure as Code?
Basically, we can deploy any other resource type with it, use parameters for environments and connect different stacks using outputs:
# stack_1
...
Resources:
...

Outputs:
     BucketName:
     Value: !Ref SourceDataBucketName
     Description: Name of the sample Datalake Amazon S3 bucket with a lifecycle configuration.
     Export:
     Name: datalakeS3BucketName
and then import resources into another stack:
# stack_2
Parameters:
...
     DatalakeBucket:
     ...
          Properties:
               BucketName:
                    Fn::Join:
                    - "."
                    - - "another"
                         - "stack"
                         - Fn::ImportValue: datalakeS3BucketName
...
This will create another bucket from stack_2.yaml using name from the stack_1.yaml.
Depending on our Data platform architecture type, we might want to add an archive storage bucket. Let's say our data platform is a lake house and we use Redshift as the main solution to transform data.
While building a data warehouse we would want to optimise storage costs associated with data in the data lake.
and apply a rule: After 90 days data files go to archive.
We could set life-cycle policy to keep only 90 days of data for the main data lake bucket, everything else should go to archive.
Then you would want to create a
Glaciertype S3 bucket and replicate your main data lake bucket there after 90 days.
 DatalakeBucket:
   Type: AWS::S3::Bucket
   DeletionPolicy: Retain
   Properties:
     ...
     LifecycleConfiguration:
       Rules:
       - Id: DatalakeBucketRule
         Status: Enabled
         Transitions:
         - TransitionInDays: 90
           StorageClass: GLACIER
           # Allowed values: DEEP_ARCHIVE | GLACIER | GLACIER_IR | INTELLIGENT_TIERING | ONEZONE_IA | STANDARD_IA
Add outputs to stack files. Becomes very useful when we can import resources from other stacks.
Add tags for cost monitoring, etc.
Add a LogGroup resource for your Lambda. They are created automatically with Lambda. It is considered as best practice to explicitly add it in Cloudformation template:
...
 OrchestratorLambdaLogGroup:
   DeletionPolicy: Delete
   Type: AWS::Logs::LogGroup
   Properties:
     RetentionInDays: 7
     LogGroupName: /aws/lambda/pipeline-orchestrator
Use this to delete existing one in case you need to:
aws --profile mds logs delete-log-group --log-group-name "/aws/lambda/pipeline-orchestrator"
Conclusion
Using AWS CloudFormation template files you can describe your required resources and their dependencies so you can launch and configure them together as a single stack.
If you are a data professional this approach can definitely help working with different data environments and replicate data platform resources faster and more consistently without errors.
Using AWS Cloudformation stack files I create
stagingandproductionCI/CD pipelines with Github Actions and changes propagate automatically.
It saves time and helps to model and provision data resources more effectively. I hope it was an easy-to-follow tutorial and felt like a user-friendly introduction to Infrastructure as code.
Github repository
https://github.com/mshakhomirov/simple_datalake/
Recommended read
1. https://docs.aws.amazon.com/cli/latest/reference/cloudformation/deploy/index.html


Mike
Mike is a Machine Learning Engineer / Python / Java Script Full stack dev / Middle shelf tequila connoisseur and accomplished napper. Stay tuned, read me on Medium https://medium.com/@mshakhomirov/membership and receive my unique content.
Comments