Commenting system with AWS Lambda and DynamoDB in 53 minutes.
This is a Part 3 of building a static website with back-end features project. Last time we built a cool static website with AWS S3, Cloudfront and Route53. We set up HTTPS for our domain name and added a script to capture user contact information. This time we will focus on back-end database and build a commenting system for our blog.
This is a part where our static website becomes dynamic.
Project layout:
Part 1: Domain name. S3. SSL, HTTPS and Cloudfront.
Part 2: Basic back-end. AWS API Gateway and Lambda functions.
You are here >>> Part 3: Commenting system with AWS lambda and Dynamo DB.
Part 4: SEO optimization.
Usefull links:
- AWS blog article explains how to create forms with AWS Lambda.
- Neuron templatelink..
If you don't have any of these then create it. It's Free!
Prerequisites:
- AWS account. If you don't have it just create it now. It's Free!. How to create AWS account
- AWS cli. you will need python distribution. Follow this article to create one if you don't have it yet.
- Google developer account.
If you don't have any of these then create it. It's Free!
Before we begin coding, let's do a bit of design first. I keep saying this - simplify. What do we want to build? In a few words a commenting system where:
These are three main features. MUST HAVE.
What would be NICE TO HAVE is also when:
How do we do it
Add a comment:
Read comments:
Kinda enough if we don't want to spend whole weekend coding rigth? But if we're quick enough we will also add extra features too.
User authentication. Google Sing in for websites.
Let's keep things modern and simple. We will use Google Sign in for websites. Google documentation is here.
Let's create a file called ./js/auth.js:
const WEB_APP ='https://www.mydataschool.com';

function onSignIn(googleUser) {
     var profile = googleUser.getBasicProfile();
     console.log('ID: ' + profile.getId()); // Do not send to your backend! Use an ID token instead.
     console.log('Name: ' + profile.getName());
     console.log('Image URL: ' + profile.getImageUrl());
     console.log('Email: ' + profile.getEmail()); // This is null if the 'email' scope is not present.

     var id_token = googleUser.getAuthResponse().id_token;
     console.log('id_token: ', id_token);
     var xhr = new XMLHttpRequest();
     xhr.open('POST', WEB_APP+'/tokensignin');
     xhr.setRequestHeader('Content-Type', 'application/x-www-form-urlencoded');
     xhr.onload = function() {
     console.log('Signed in as: ' + xhr.responseText);
     };
     xhr.send('idtoken=' + id_token);


     var myUserEntity = {};
     myUserEntity.Id = profile.getId();
     myUserEntity.Name = profile.getName();
     myUserEntity.email = profile.getEmail();
     //Store the entity object in sessionStorage where it will be accessible from all pages of your site.
     sessionStorage.setItem('myUserEntity',JSON.stringify(myUserEntity));
     alert(profile.getName());
     // window.location.replace("https://9f88cb72.ngrok.io/sign");

}
;


function checkIfLoggedIn() {
     if(sessionStorage.getItem('myUserEntity') == null){
          //Redirect to login page, no user entity available in sessionStorage
          console.log('Not logged in');
          // window.location.href='sign.html';
     } else {
          //User already logged in
          var userEntity = {};
          userEntity = JSON.parse(sessionStorage.getItem('myUserEntity'));
          console.log('user_entity: ',userEntity );
          console.log('Not logged in');
     }
}
;
This code is our logic for user authentication. Read the comments inside but pay attention to first two lines. We have a WEB_APP variable required by Google auth library which we will add in a second. However, it is important to know that any authentication libraries work only with https secure connections. That's why your website must have HTTPS enabled. We did it in the Part 1.
Now let's proceed and register our web application with Google. For that you will need google developer account. Don't worry, it's free. Go and get one here.
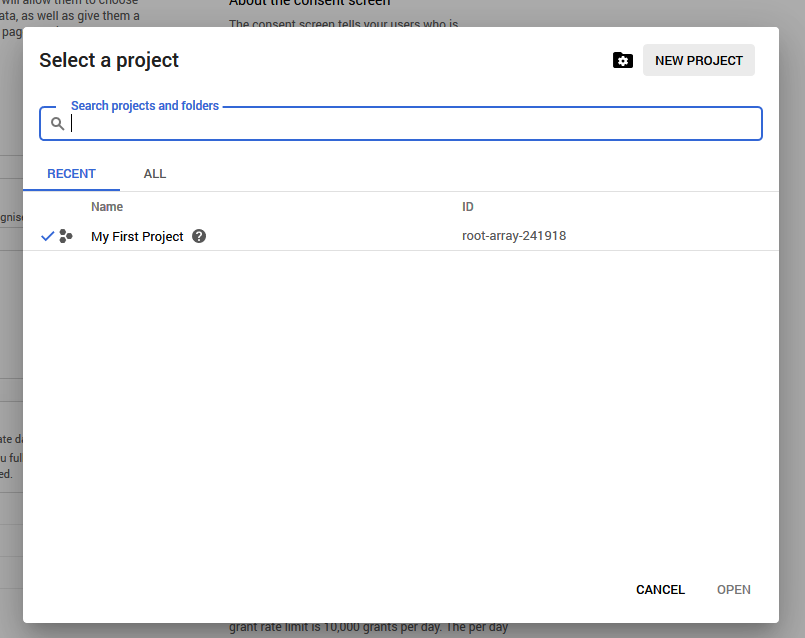
Just provide you credit card details and that will set it up. Now go here and create your First project:
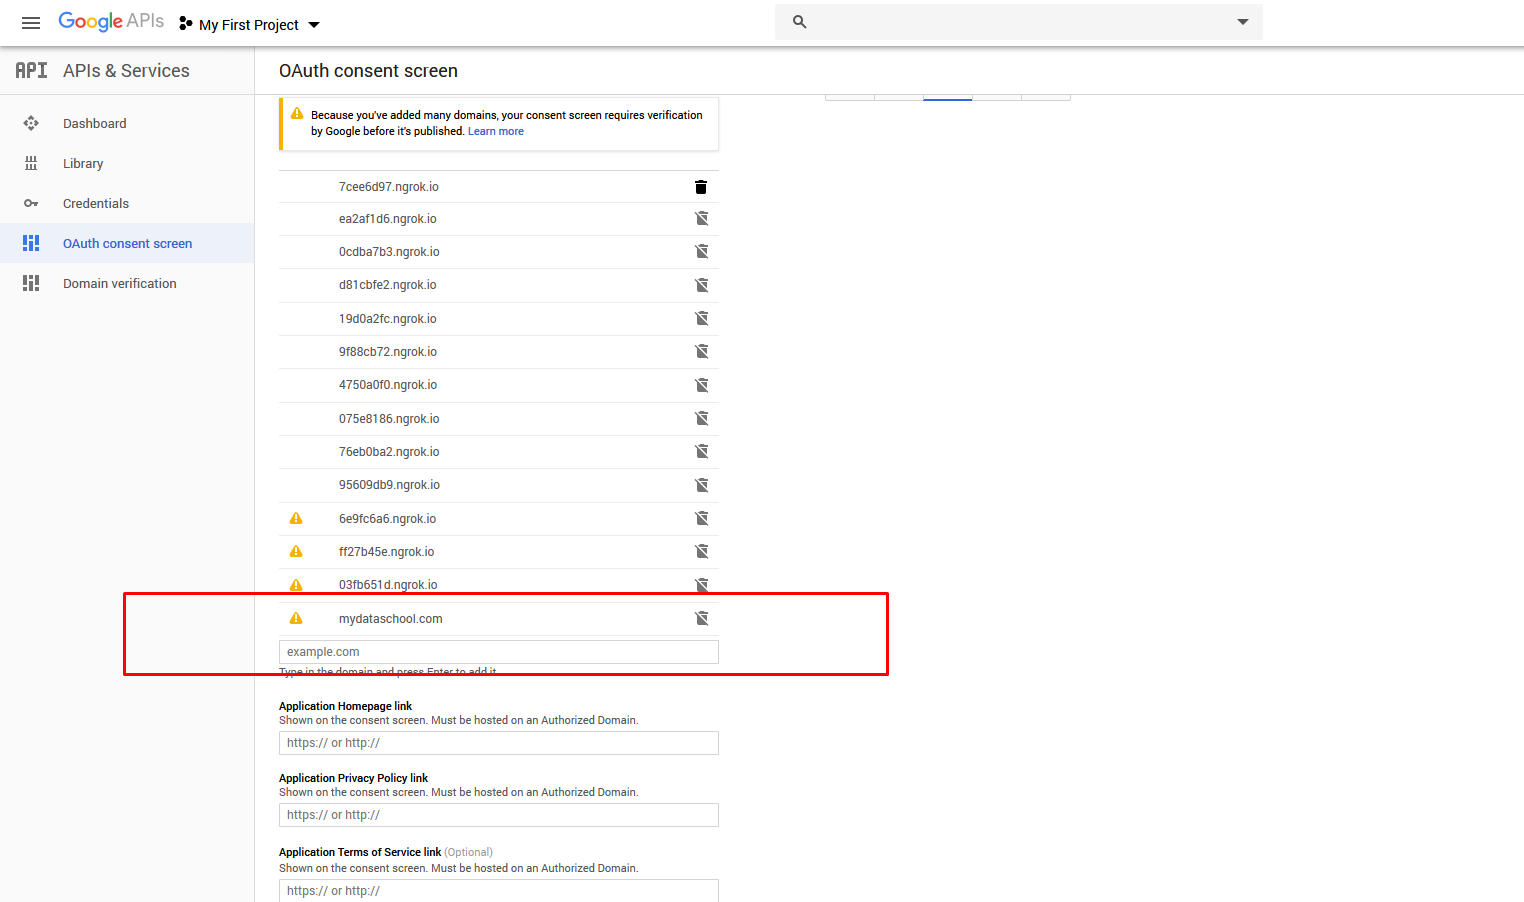
Now go to OAuth consent screen and add your website https address there, like so:
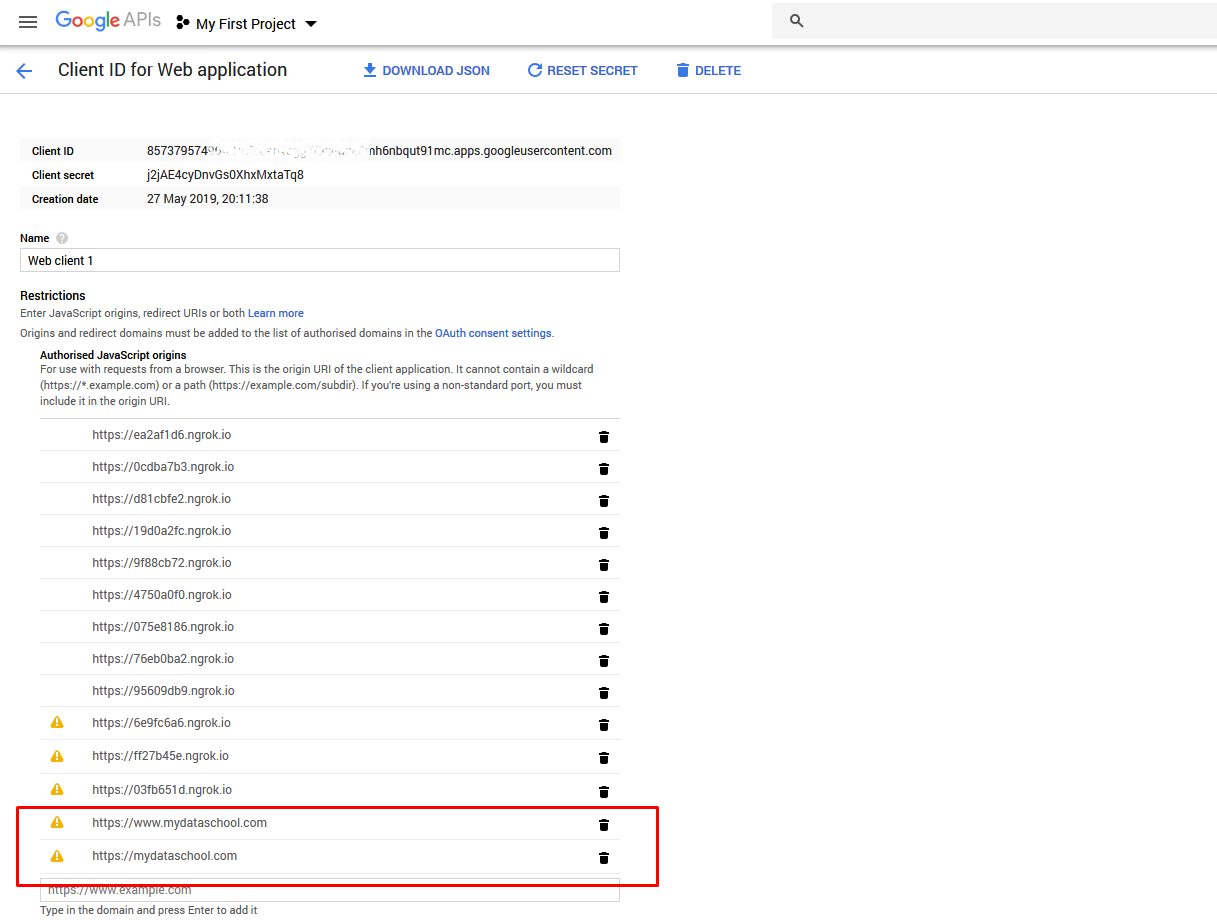
Now go to your web client and add your https address there too:

Copy your app's CLIENT_ID from there.
Now let's go back to our application ./js/auth.js and update WEB_APP variable to your https address as well.
Now go to your web page, in my case it's this tutorial page ./tutWebsite-3.html and add Google auth script inside HEAD section where content = 'your web app CLIENT_ID' from Google credentials section:
<script src="https://apis.google.com/js/platform.js" async defer></script>
<meta name="google-signin-client_id" content="857379574964-1m5raao4ggg7f9g8gga0mh6nbqut91mc.apps.googleusercontent.com">
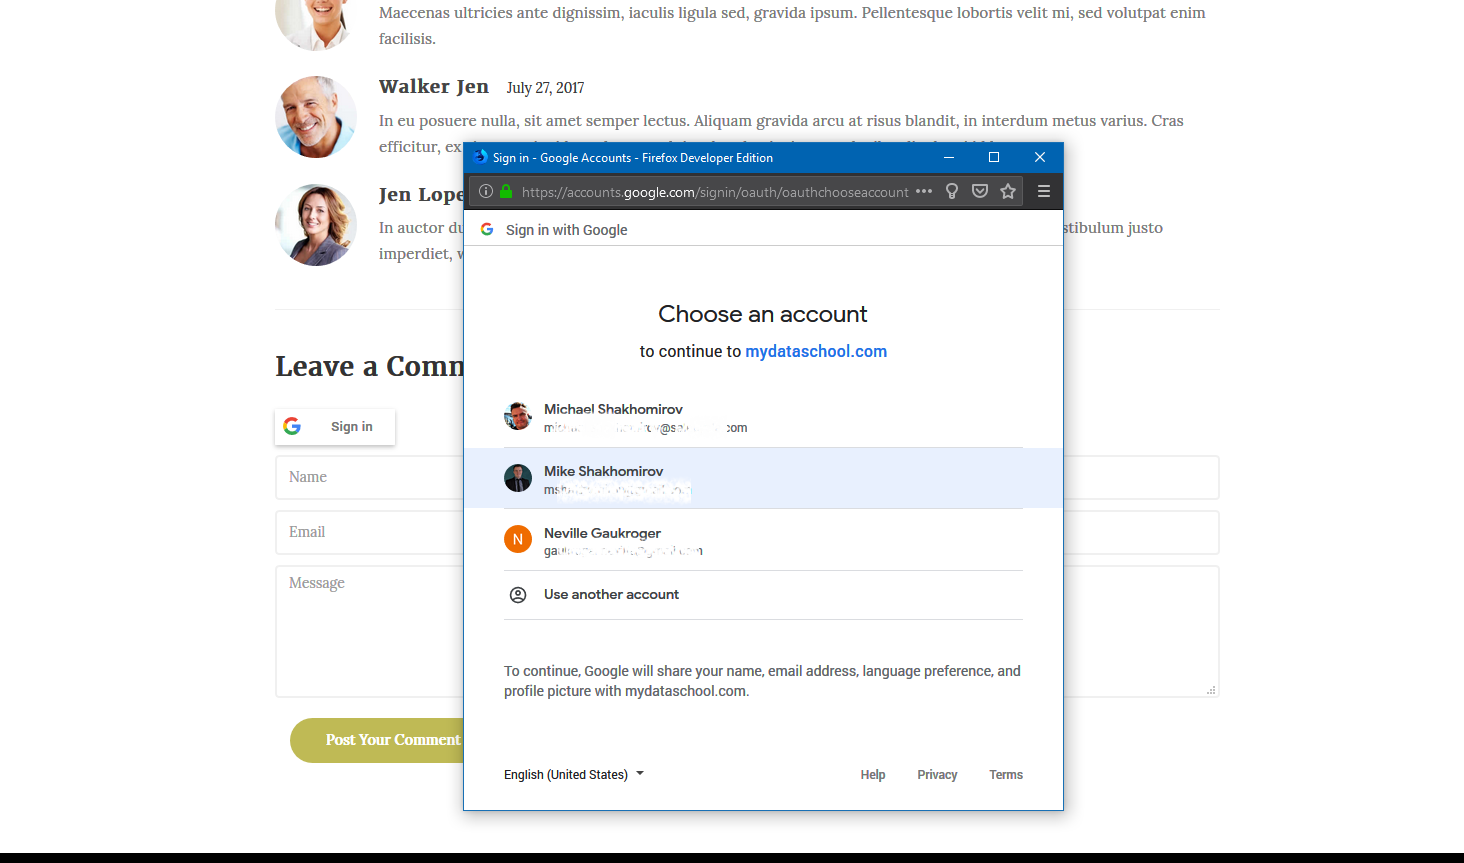
Now let's add Google Sign in button. Copy paste this snippet to your web page where you want this button to be. In our case it is near Leave a comment section:
<h3>Leave a Comment</h3>
<div id="signin-button" class="g-signin2" data-onsuccess="onSignIn"></div>
...
Now let's save our ./tutWebsite-3.html and upload it to S3
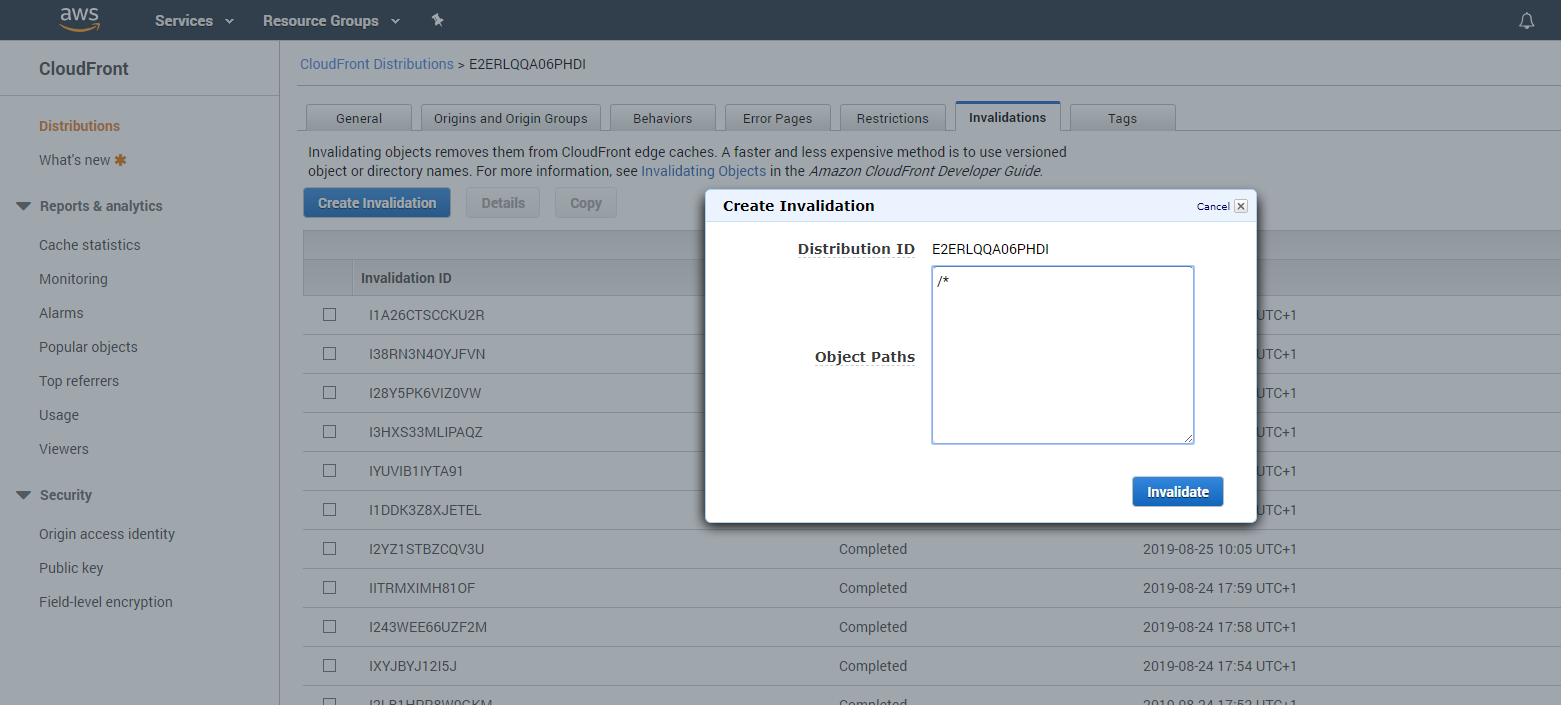
Let's create a Cloudfront invalidation and wait a few seconds:
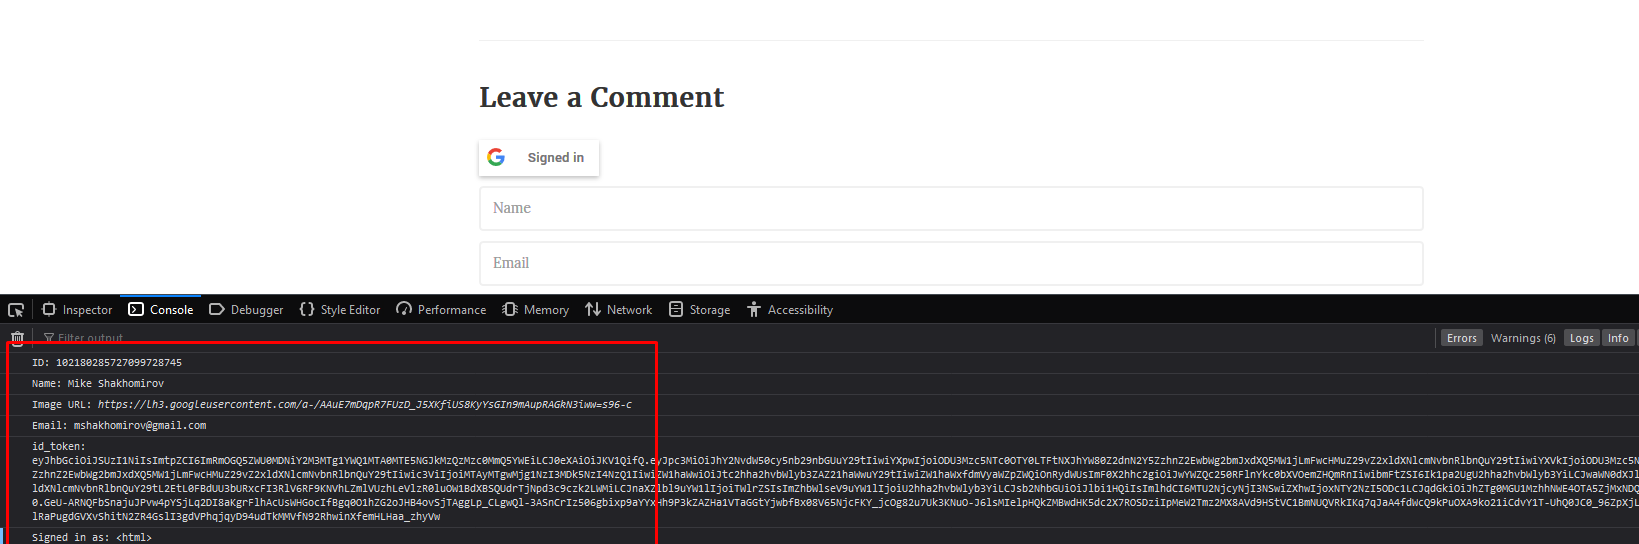
Great! We have just finished user authentication with Google!
Let's open console and take a look what's there. Great! we have user data now:
Add 'POST comment' feature
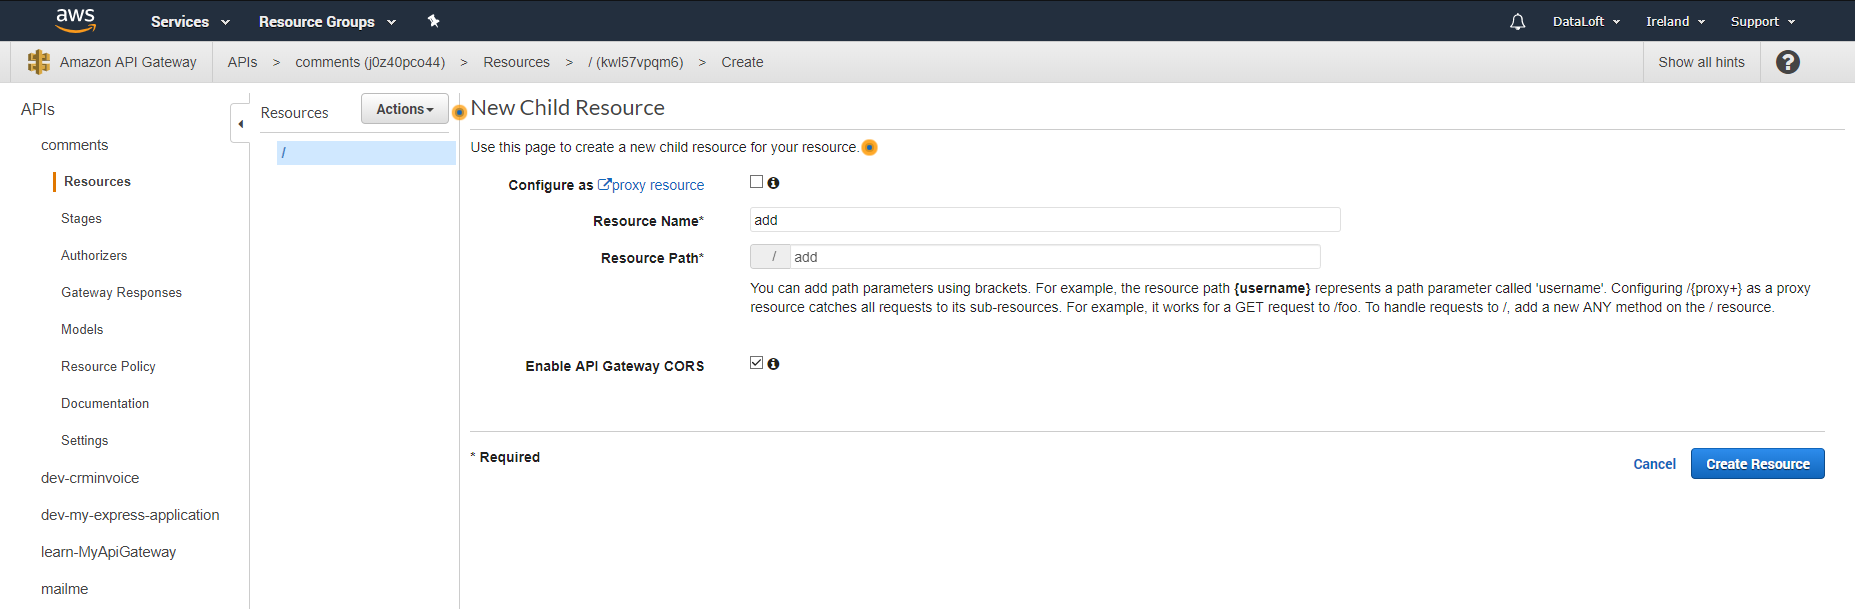
Let's create another API gateway endpoint which will catch POST requests from our blog page when someone posts a comment.
Lambda --> Create function:
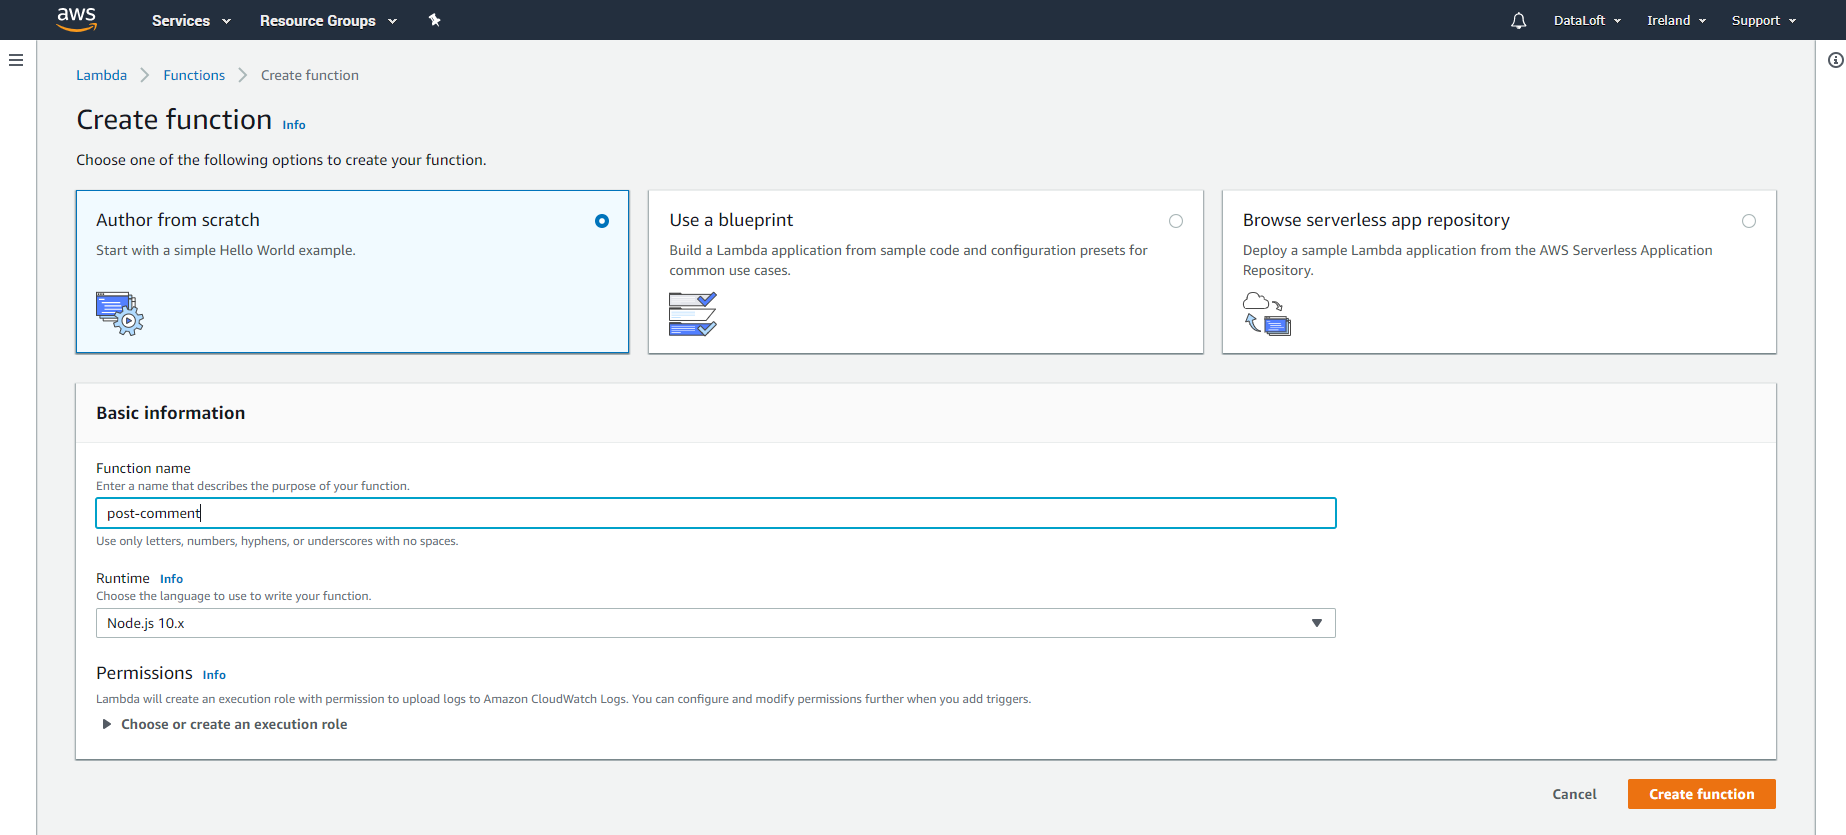
In lambda index.js add the following:
exports.handler = async (event) => {

     console.log('event: ',event);


     const response = {
          headers: { 'Content-Type': 'application/json', 'Access-Control-Allow-Origin': '*'

          },
          statusCode: 200,
          body: JSON.stringify(event),
     };
     return response;
};
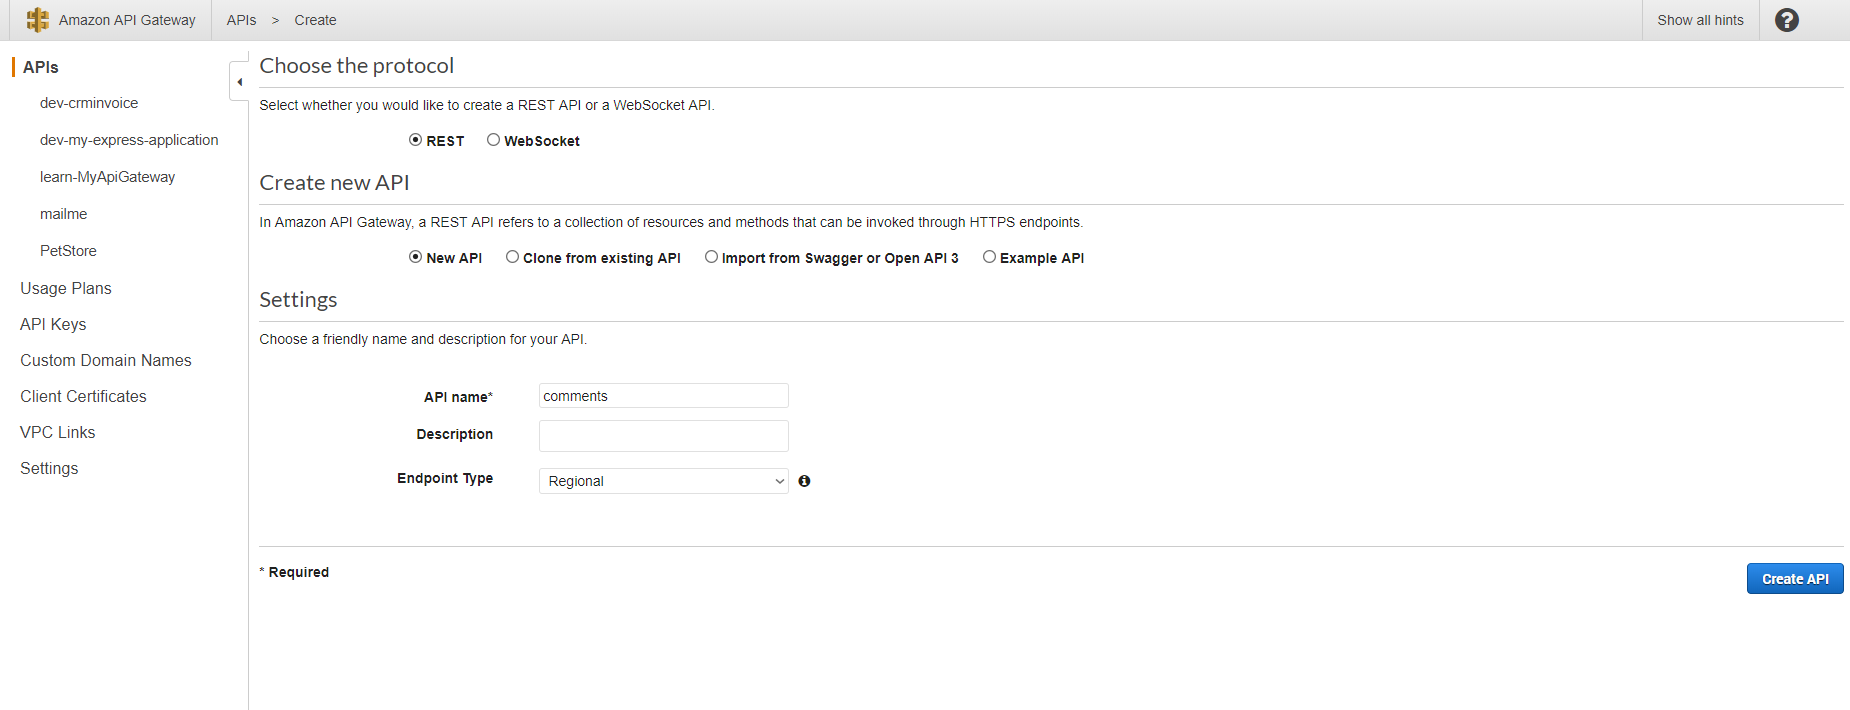
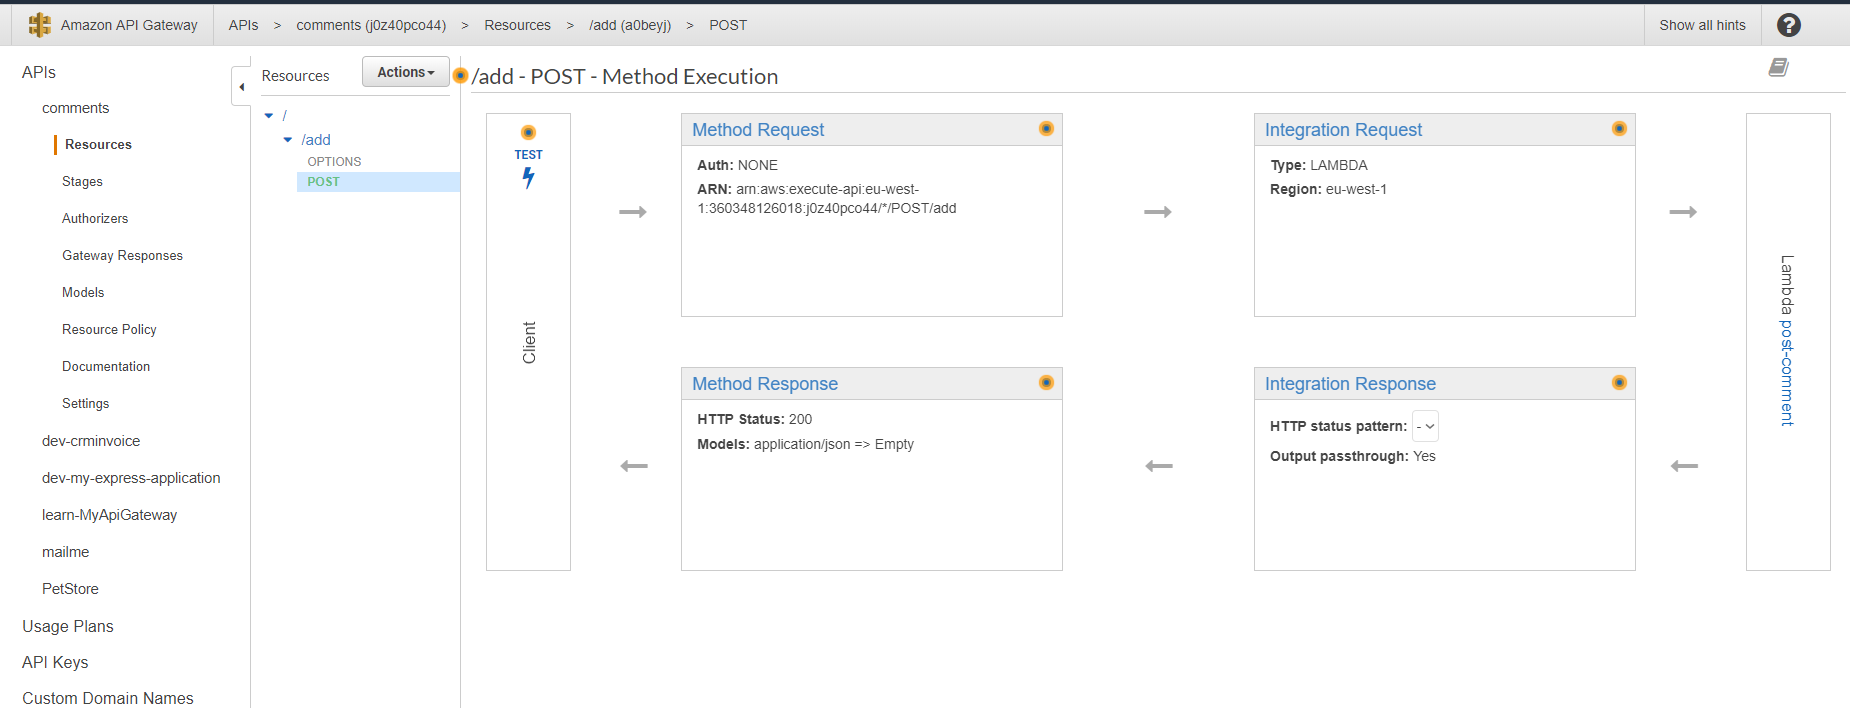
API Gateway --> Create API --> Add Lambda post-comment:
Then click test and in request body use this:
{
     "PAGE_ID": "tutWebsite-2",
     "USER_ID" : "002",
     "USER_NAME": "Richard Roe",
     "USER_COMMENT" : "Some comment"
}
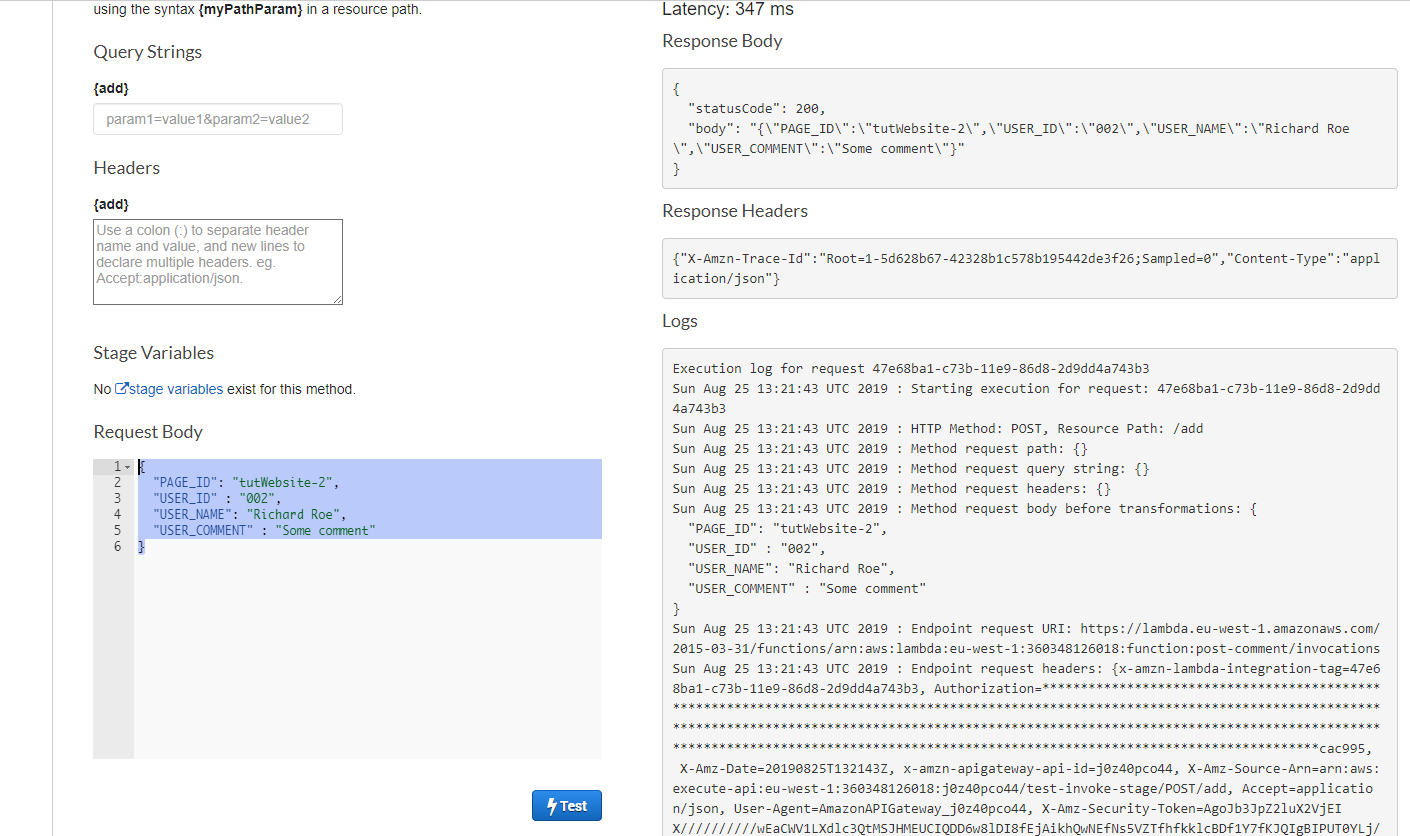
Great! Everything seems to be working fine. Let's add a JS to send POST request to this endpoint from our blog page.
Go to our ./tutWebsite-3.html file or whatever file you are using instead. We will be using axios library to send POST requsts this time.
Axios is a modern liabrary which can send XML HTTP requests from both server and client side. Far way better than AJAX which looks horrible.
Add this to HEAD section of your page:
<script src="https://unpkg.com/axios/dist/axios.min.js"></script>
Let's create file ./js/commentsHelper.js where postCommentEndpoint your API Gateway endpoint for posting comments:
function postComment() {
//find the form and stop it from refreshing. We only need it to submit contents onClick:
document.getElementById("comments-form").addEventListener('submit', function (event) { event.preventDefault(); });
if (sessionStorage.getItem('myUserEntity') != null) {

     console.log('Posting comment >>>>>>>>>>>>');
     console.log('PAGE_ID: ', window.location.pathname);
     console.log('USER_ID: ', JSON.parse(sessionStorage.getItem('myUserEntity')).Id);
     console.log('USER_NAME: ', JSON.parse(sessionStorage.getItem('myUserEntity')).Name);
     console.log('USER_COMMENT: ', document.getElementById("message").value);

     let config = {
          headers: { 'Content-Type': 'application/json', 'Access-Control-Allow-Origin': '*' }
     };

     let postCommentEndpoint = 'https://j0z40pco44.execute-api.eu-west-1.amazonaws.com/live/add';
     let comment = {
          "PAGE_ID": window.location.pathname,
          "USER_ID": JSON.parse(sessionStorage.getItem('myUserEntity')).Id,
          "USER_NAME": JSON.parse(sessionStorage.getItem('myUserEntity')).Name,
          "USER_EMAIL": JSON.parse(sessionStorage.getItem('myUserEntity')).email,
          "USER_COMMENT": document.getElementById("message").value
     }


     if (document.getElementById("message").value != "") {
          //Send data to API Gateway
          axios.post(postCommentEndpoint, comment, config)
               .then(function (response) {
                    //reset the form contents:
                    document.getElementById("comments-form").reset();
                    window.location.reload(false)   ;
               })
               .catch(function (error) {
               console.log(error);
               });

     } else {
          alert("Please enter your comment");
          console.log('No message');
     }
}
else {
     console.log('Not logged in');
     // window.location.href='sign.html';
     alert ("OhOoh! Akuma is our coding monkey 🐒  can't send your comment. You need to Sign In first.");
}
}
;
Now let's add onClick event to our ./tutWebsite-3.html:
<div class="col-md-3 col-sm-4">
<input name="submit" type="submit" class="form-control" id="submit" value="Post Your Comment" onClick="postComment()">
...
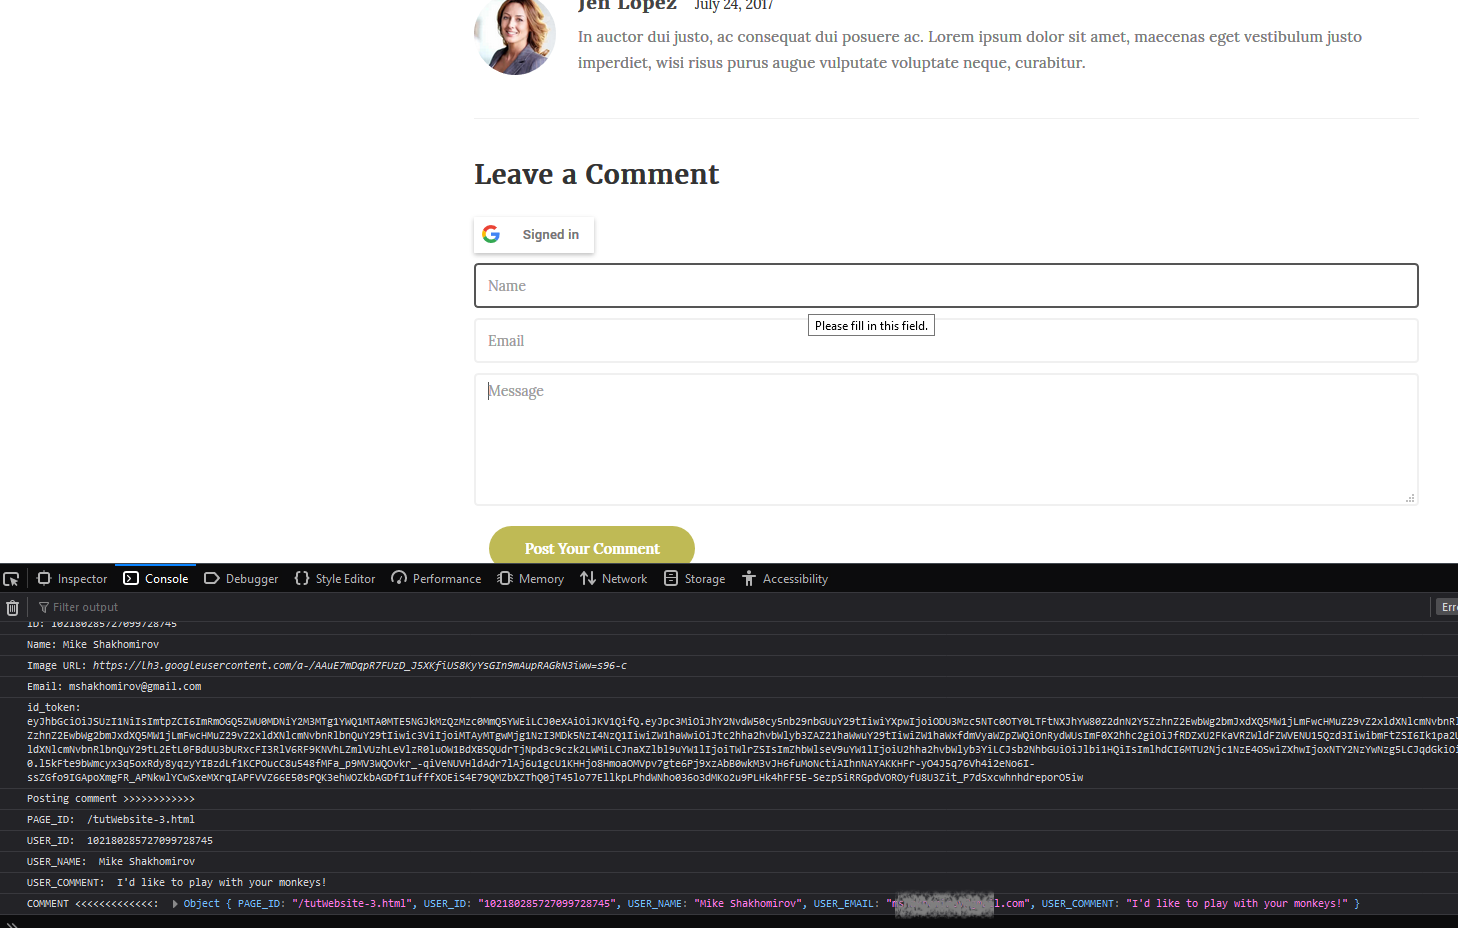
Now let's upload your updated ./js/commentsHelper.js to S3 and create new invalidation in cloudfront so the old version is rewritten. Go to your website URL, open console and see what happens when you click 'Send a comment' button.
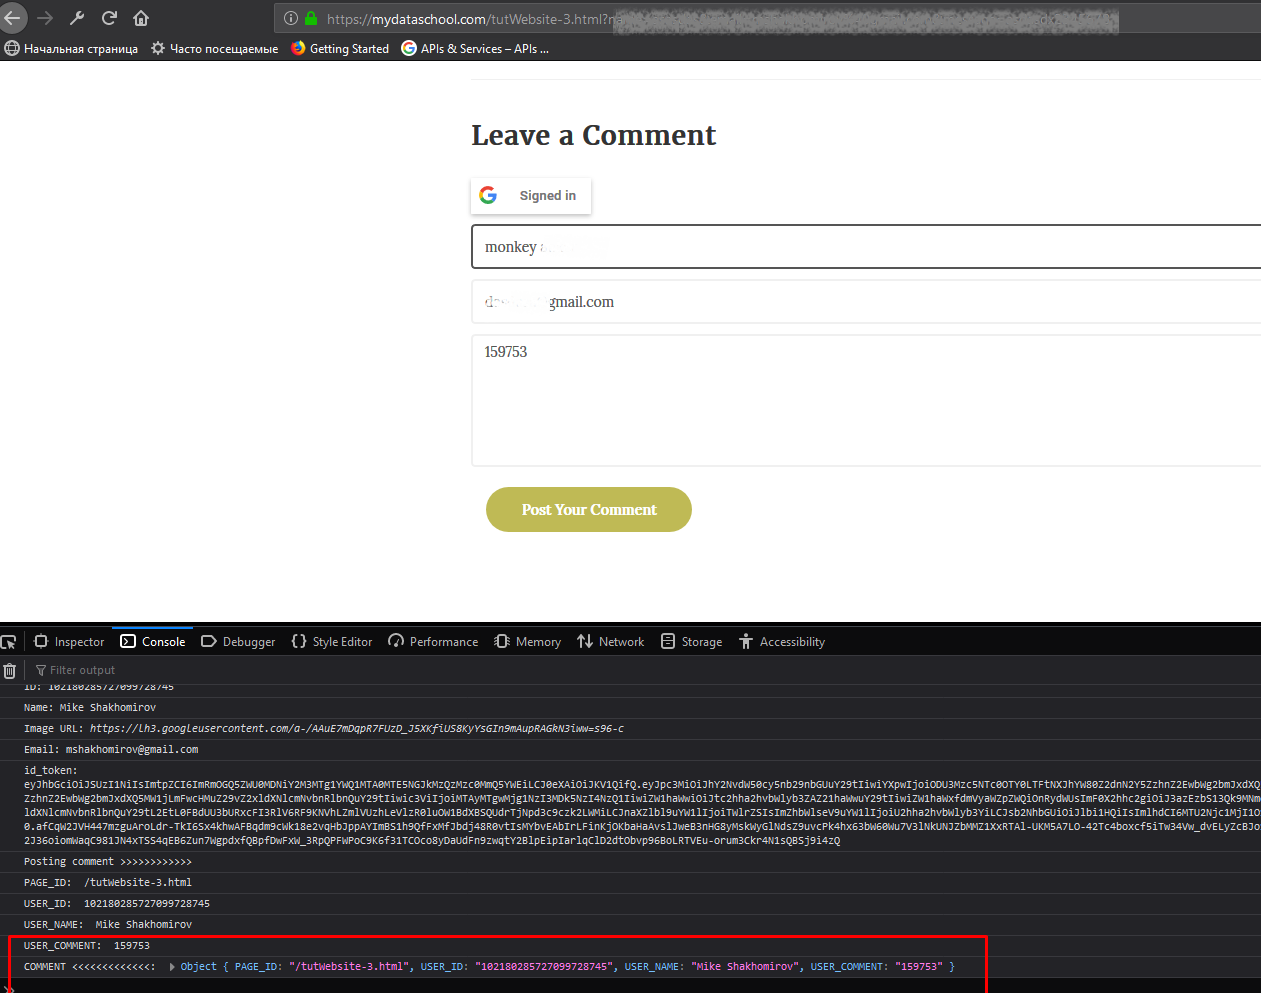
Great! Now go check lambda logs. You'll find this data there. Now we will change the lambda to save it in Dynamo.
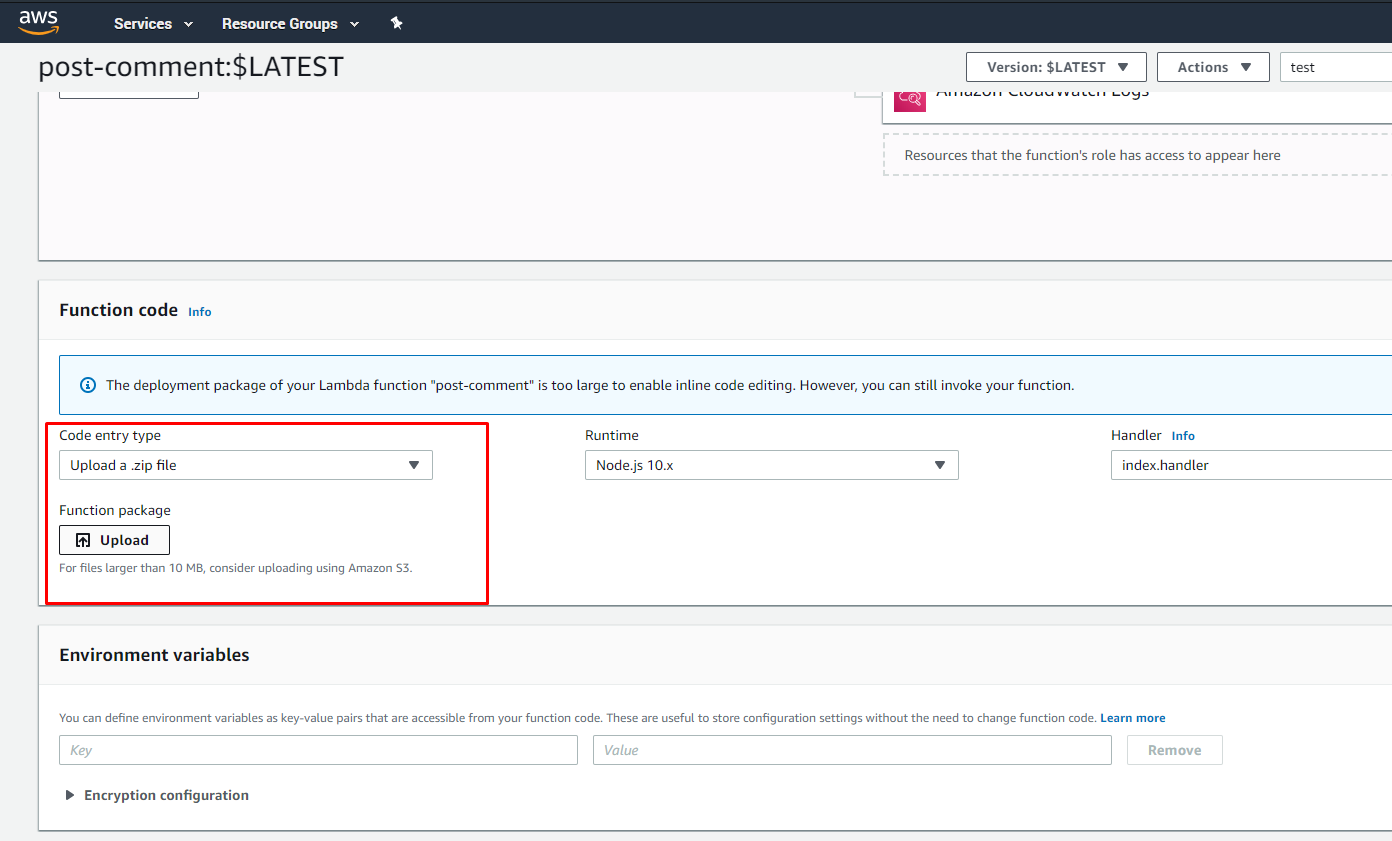
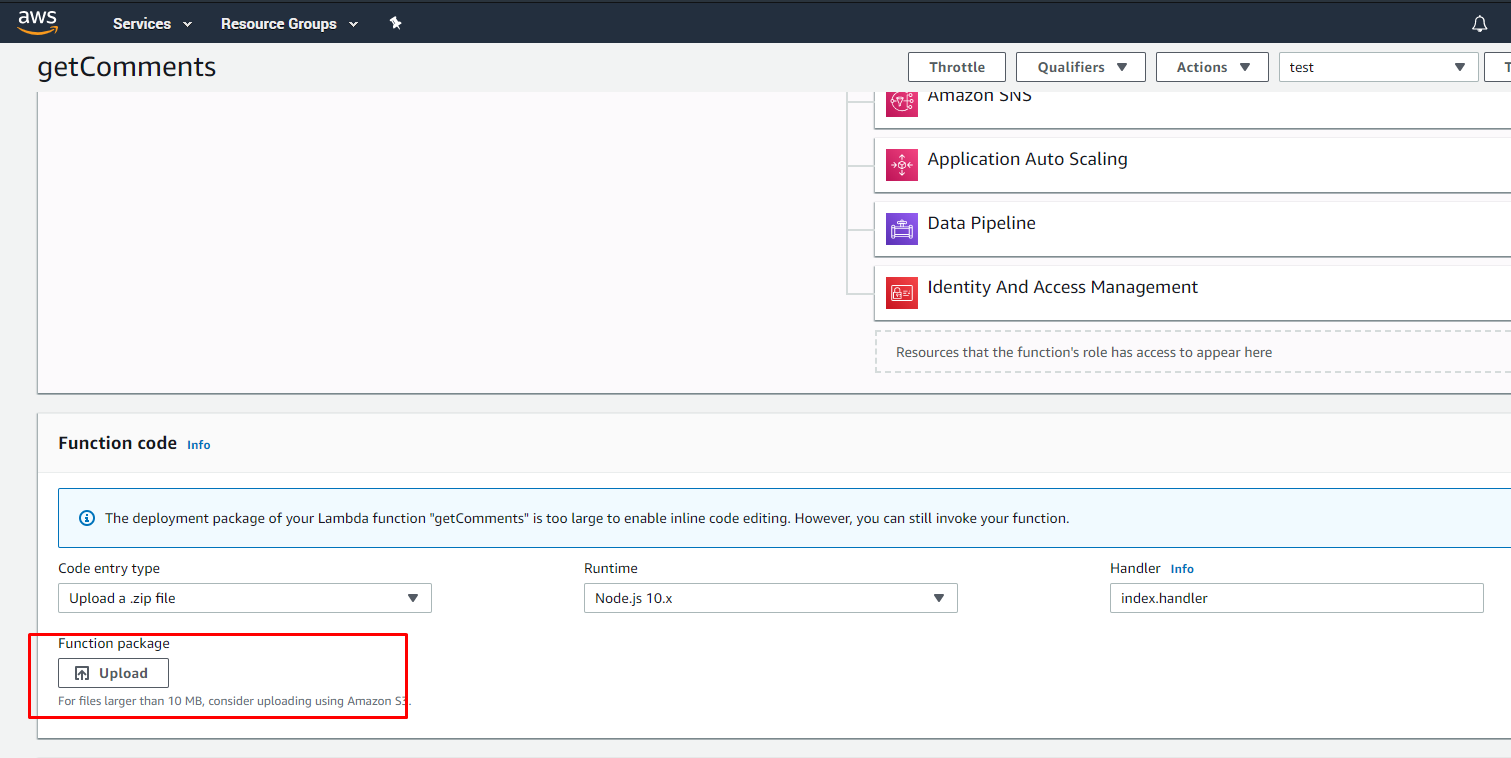
For the next step you 'll neeed Node.js installed and AWS CLI configured. That is a separate topic so just download the lambda archive: DynamoLambda.zip . Upload the Lambda code :
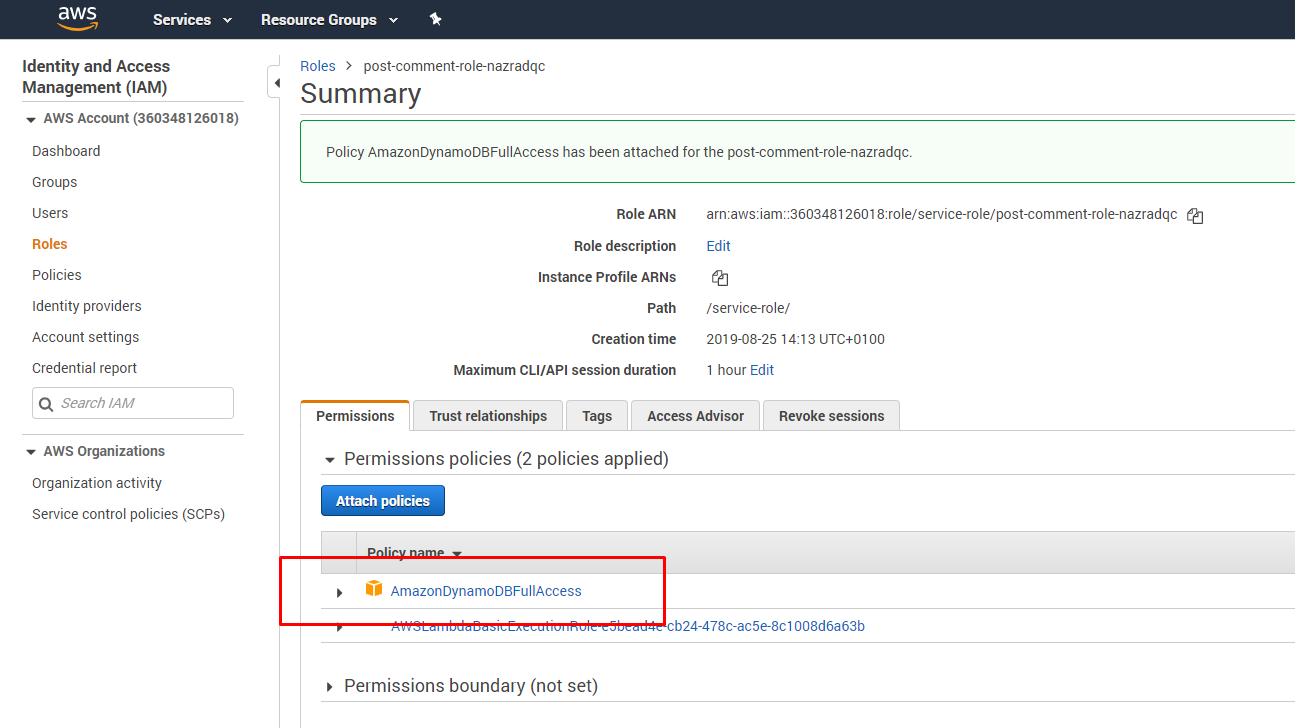
Now we need to update Lambda Role to have permissions for Dynamo. Go to Services --> IAM --> search your lambda role --> Attach policy:
Now let's go to our website and try to post a comment. Let's check the lambda logs and Dynamo table:
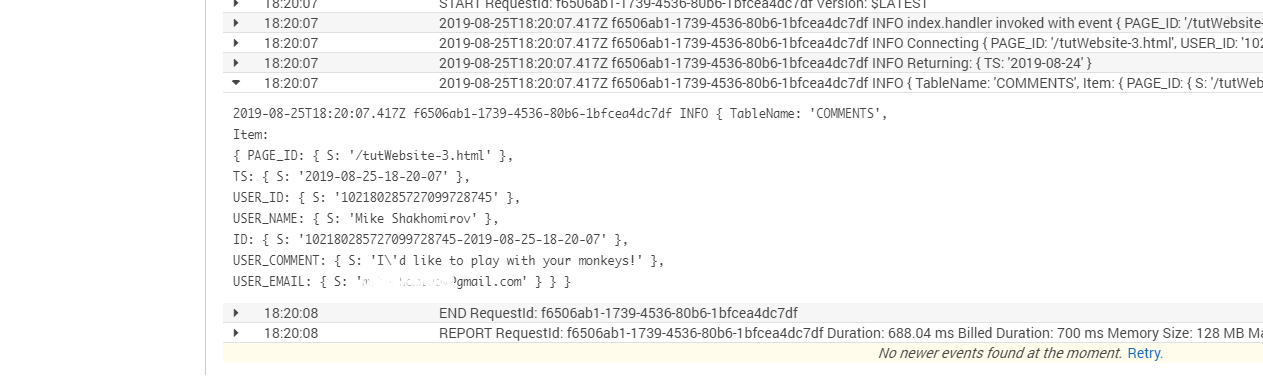
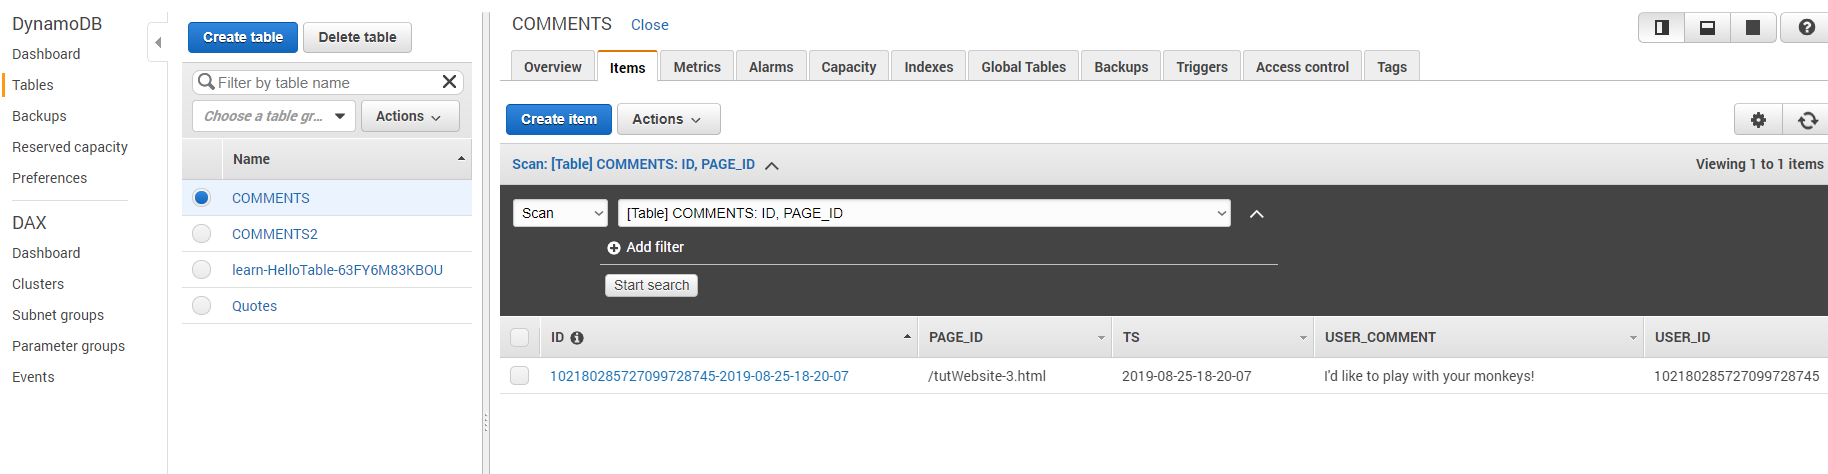
New comment record is there! Great! We have just finished a 'Post comment' feature!
Now let's add 'Get comments' feature!
The idea will be the same. We need an API Gateway endpoint, a Lambda and JavaScript on our blog page. We will use blog page location path as query parameter to pull comments related to this particular page from Dynamo.
Let's begin coding. Create a Lambda function with this code:
"use strict";
const moment = require('moment');

const AWS = require('aws-sdk');

AWS.config.update({region: "eu-west-1"});
let s3 = new AWS.S3();
// Create the DynamoDB service object
const ddb = new AWS.DynamoDB({ apiVersion: '2012-08-10' });

const docClient = new AWS.DynamoDB.DocumentClient();


exports.handler = async (event, context) => {
    console.log("index.handler invoked with event ", event);

    try {
        let data = await processEvent(event);
        context.succeed(data);
    } catch (e) {
        console.log(e);
        context.done(e);
    }
};


let processEvent = async (event) => {

    console.log("Connecting", event);

    let date = moment().subtract(1, 'd').format("YYYY-MM-DD");
    let ts = moment().format("YYYY-MM-DD-HH-mm-ss");
    let endDate = moment(date).add(1, 'd').format("YYYY-MM-DD");
    let comment = {};
    comment.TS = date;
    console.log("Returning: ", comment);

    let params =     {
        TableName: "COMMENTS",
        KeyConditionExpression: "PAGE_ID = :a ",
        ExpressionAttributeValues: {
            ":a": "/tutWebsite-3.html"
        }
    };

    // let params =     {
    //     TableName: "COMMENTS",
    //     KeyConditionExpression: "PAGE_ID = :a and begins_with(ID, :t)",
    //     ExpressionAttributeValues: {
    //         ":a": "/tutWebsite-3.html",
    //         ":t": "msha"
    //     }
    // };

    // let params =     {
    //     TableName: "COMMENTS",
    //     KeyConditionExpression: "ID = :t",
    //     ExpressionAttributeValues: {
    //         ":t": "102180285727099728745-2019-08-25-18-20-07"
    //     }
    // };


    console.log(params);
    let getCommentsResults = await getComments(params);

    const response = {
        headers: { 'Content-Type': 'application/json', 'Access-Control-Allow-Origin': '*'

        },
        statusCode: 200,
        body: JSON.stringify(getCommentsResults),
    };
    return response;


    // return getCommentsResults;
};

let getComments = async (params) => {
    let result = await docClient.query(params).promise();
    return result;
};

//? https://docs.aws.amazon.com/amazondynamodb/latest/developerguide/SQLtoNoSQL.ReadData.Query.html
Should you wish to skip the part where you can test and run it locally here here is the zip archive with all the node modules installed. Just upload it to Lambda. If you want to run it locally just go to Lambda folder and in command line do node test.
Use the same IAM role we used for our first Lambda.
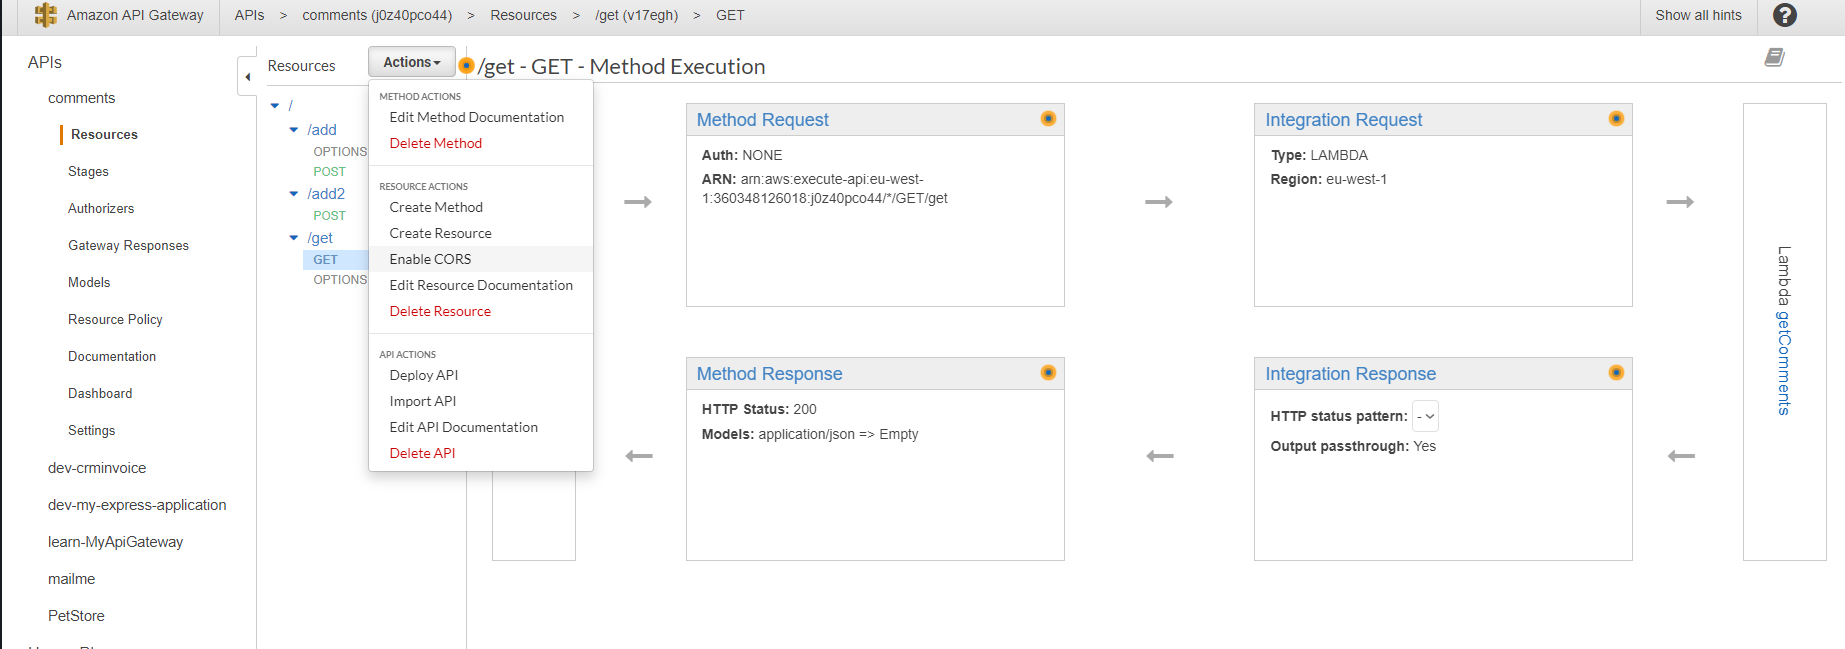
Now let's create API endpoint. Go to API Gateway --> Create resourse 'get' --> add method GET --> Select method --> Enable CORS --> Deploy API
Great! Now let go back to our webpage and add this code to ./js/commentsHelper.js which will be responsible for getting the comments from Dynamo:
function getComments() {
let getCommentsEndpoint = 'https://j0z40pco44.execute-api.eu-west-1.amazonaws.com/live/get';
let config = {
headers: { 'Content-Type': 'application/json', 'Access-Control-Allow-Origin': '*' }
};
axios.get(getCommentsEndpoint, config)
.then(function (response) {
console.log(response);
})
.catch(function (error) {
console.log(error);
});
}
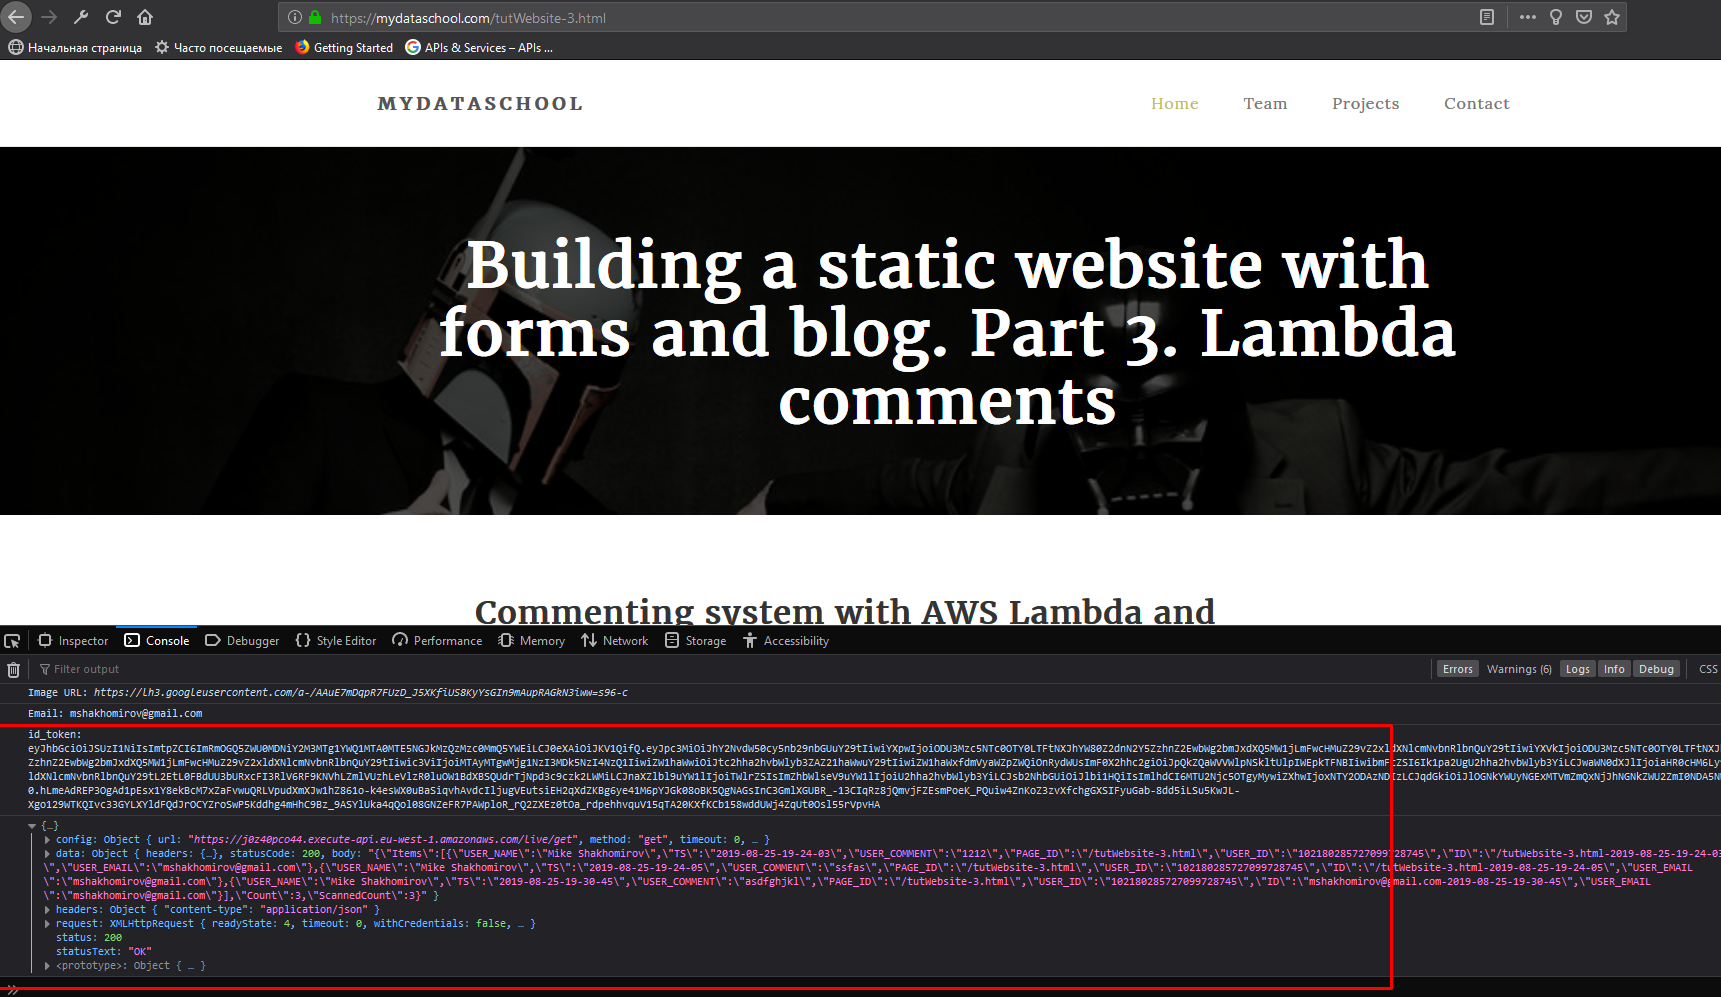
; Now we need to update our blog page to execute this script when it loads:
<body onLoad="getComments();">Let's upload the page and the script to S3, create invalidation and see what happens when open the page in the browser:
Now we need to use this JSON commets to dynamically change the page each time we load it. Let's add a function to our ./js/commentsHelper.js
/**
 * This fucntion will add a new comments:
 */

function addElement(parentId, elementTag, elementId) {
    let html = `
    <div class="media-object pull-left">
    <img src="images/comment-image1.jpg" class="img-responsive img-circle" alt="Blog Image 22">
    </div>
    <div class="media-body">
    <h3 class="media-heading">Omar Larus</h3>
    <span>5 days ago</span>
    <p>Maecenas ultricies ante dignissim, iaculis ligula sed, gravida ipsum. Pellentesque lobortis velit mi, sed volutpat enim facilisis.
    </div>
    `;

    //──── Adds an element to the document ───────────────────────────────────────────────────
    let p = document.getElementById(parentId);
    let newElement = document.createElement(elementTag);
    newElement.setAttribute('id', elementId);
    newElement.setAttribute("class", "media");
    newElement.innerHTML = html;
    p.appendChild(newElement);
}
;
Now let's update our getComments() function:
function getComments() {
let getCommentsEndpoint = 'https://j0z40pco44.execute-api.eu-west-1.amazonaws.com/live/get';
let config = {
     headers: { 'Content-Type': 'application/json', 'Access-Control-Allow-Origin': '*' }
};
axios.get(getCommentsEndpoint, config)
.then(function (response) {
     console.log(JSON.parse(response.data.body).Items);
     let items = JSON.parse(response.data.body).Items;
     //Add comments to HTML source:
     for (let i = 0; i < JSON.parse(response.data.body).Items.length; ++i) {
          addElement('tbodyID', 'div', 'comment' + i);
          console.log(document.getElementById('comment' + i).getElementsByTagName('h3')[0].innerHTML);
          document.getElementById('comment' + i).getElementsByTagName('h3')[0].innerHTML = items[i].USER_NAME;
          document.getElementById('comment' + i).getElementsByTagName('p')[0].innerHTML = items[i].USER_COMMENT;
     }
})
.catch(function (error) {
console.log(error);
});
}
;
And that is it! Realy. Let's refresh the page:
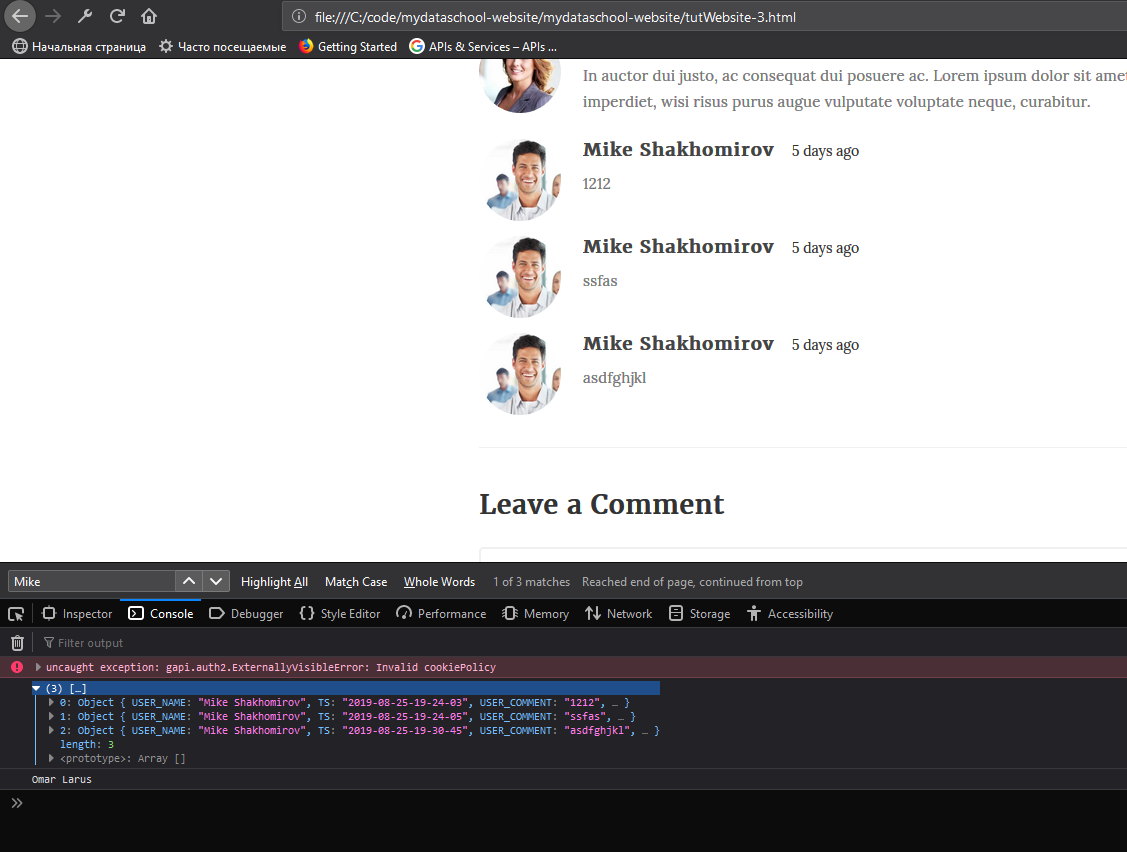
We have just finished 'Get comments' feature! Let's upload changes to S3. Done.
There is still a lot of place for improvement. For example, we could pull user avatars from gool auth too and many other things but that should suffice for now.
Part 3 is done!
We covered such topics as as user authentication and API requests to AWS API Gateway. Next in Part 4 we will talk about SEO optmization.
Thanks for reading!

Mike
Mike is a Machine Learning Engineer / Python / Java Script Full stack dev / Middle shelf tequila connoisseur and accomplished napper. Stay tuned, read me on Medium https://medium.com/@mshakhomirov/membership and receive my unique content.
Comments
Jen Lopez
July 24, 2017In auctor dui justo, ac consequat dui posuere ac. Lorem ipsum dolor sit amet, maecenas eget vestibulum justo imperdiet, wisi risus purus augue vulputate voluptate neque, curabitur.